Admin
Bills Approval Workflow
The Bills Approval Workflow lets you require one or more designated approvers to review and authorize a bill before it can be paid. Use it to prevent unauthorized payments, ensure the right people sign off on vendor invoices, and maintain a clear audit trail of who approved what and when.
Getting There
Navigate to Settings → Workflow Settings → Approvals and select the Bills tab. You can also go directly to /settings/workflows/approvals?tab=bills.
Workflow Settings
At the top of the page, two optional settings apply to the entire bills workflow:
- Lock records after approval — Prevents edits to a bill once it has been fully approved, preserving the integrity of the approved record.
- Skip approval for bills created from Work Orders — Bypasses the approval workflow for bills that are automatically generated from work orders, so routine maintenance bills don't create unnecessary hold-ups.
Check either box to enable it, then click Save.
Configuring Approval Rules
Rules define the conditions under which approval is required and who must provide it. You can create multiple rules to cover different scenarios — for example, one rule for large invoices and another for a specific vendor.
Adding a Rule
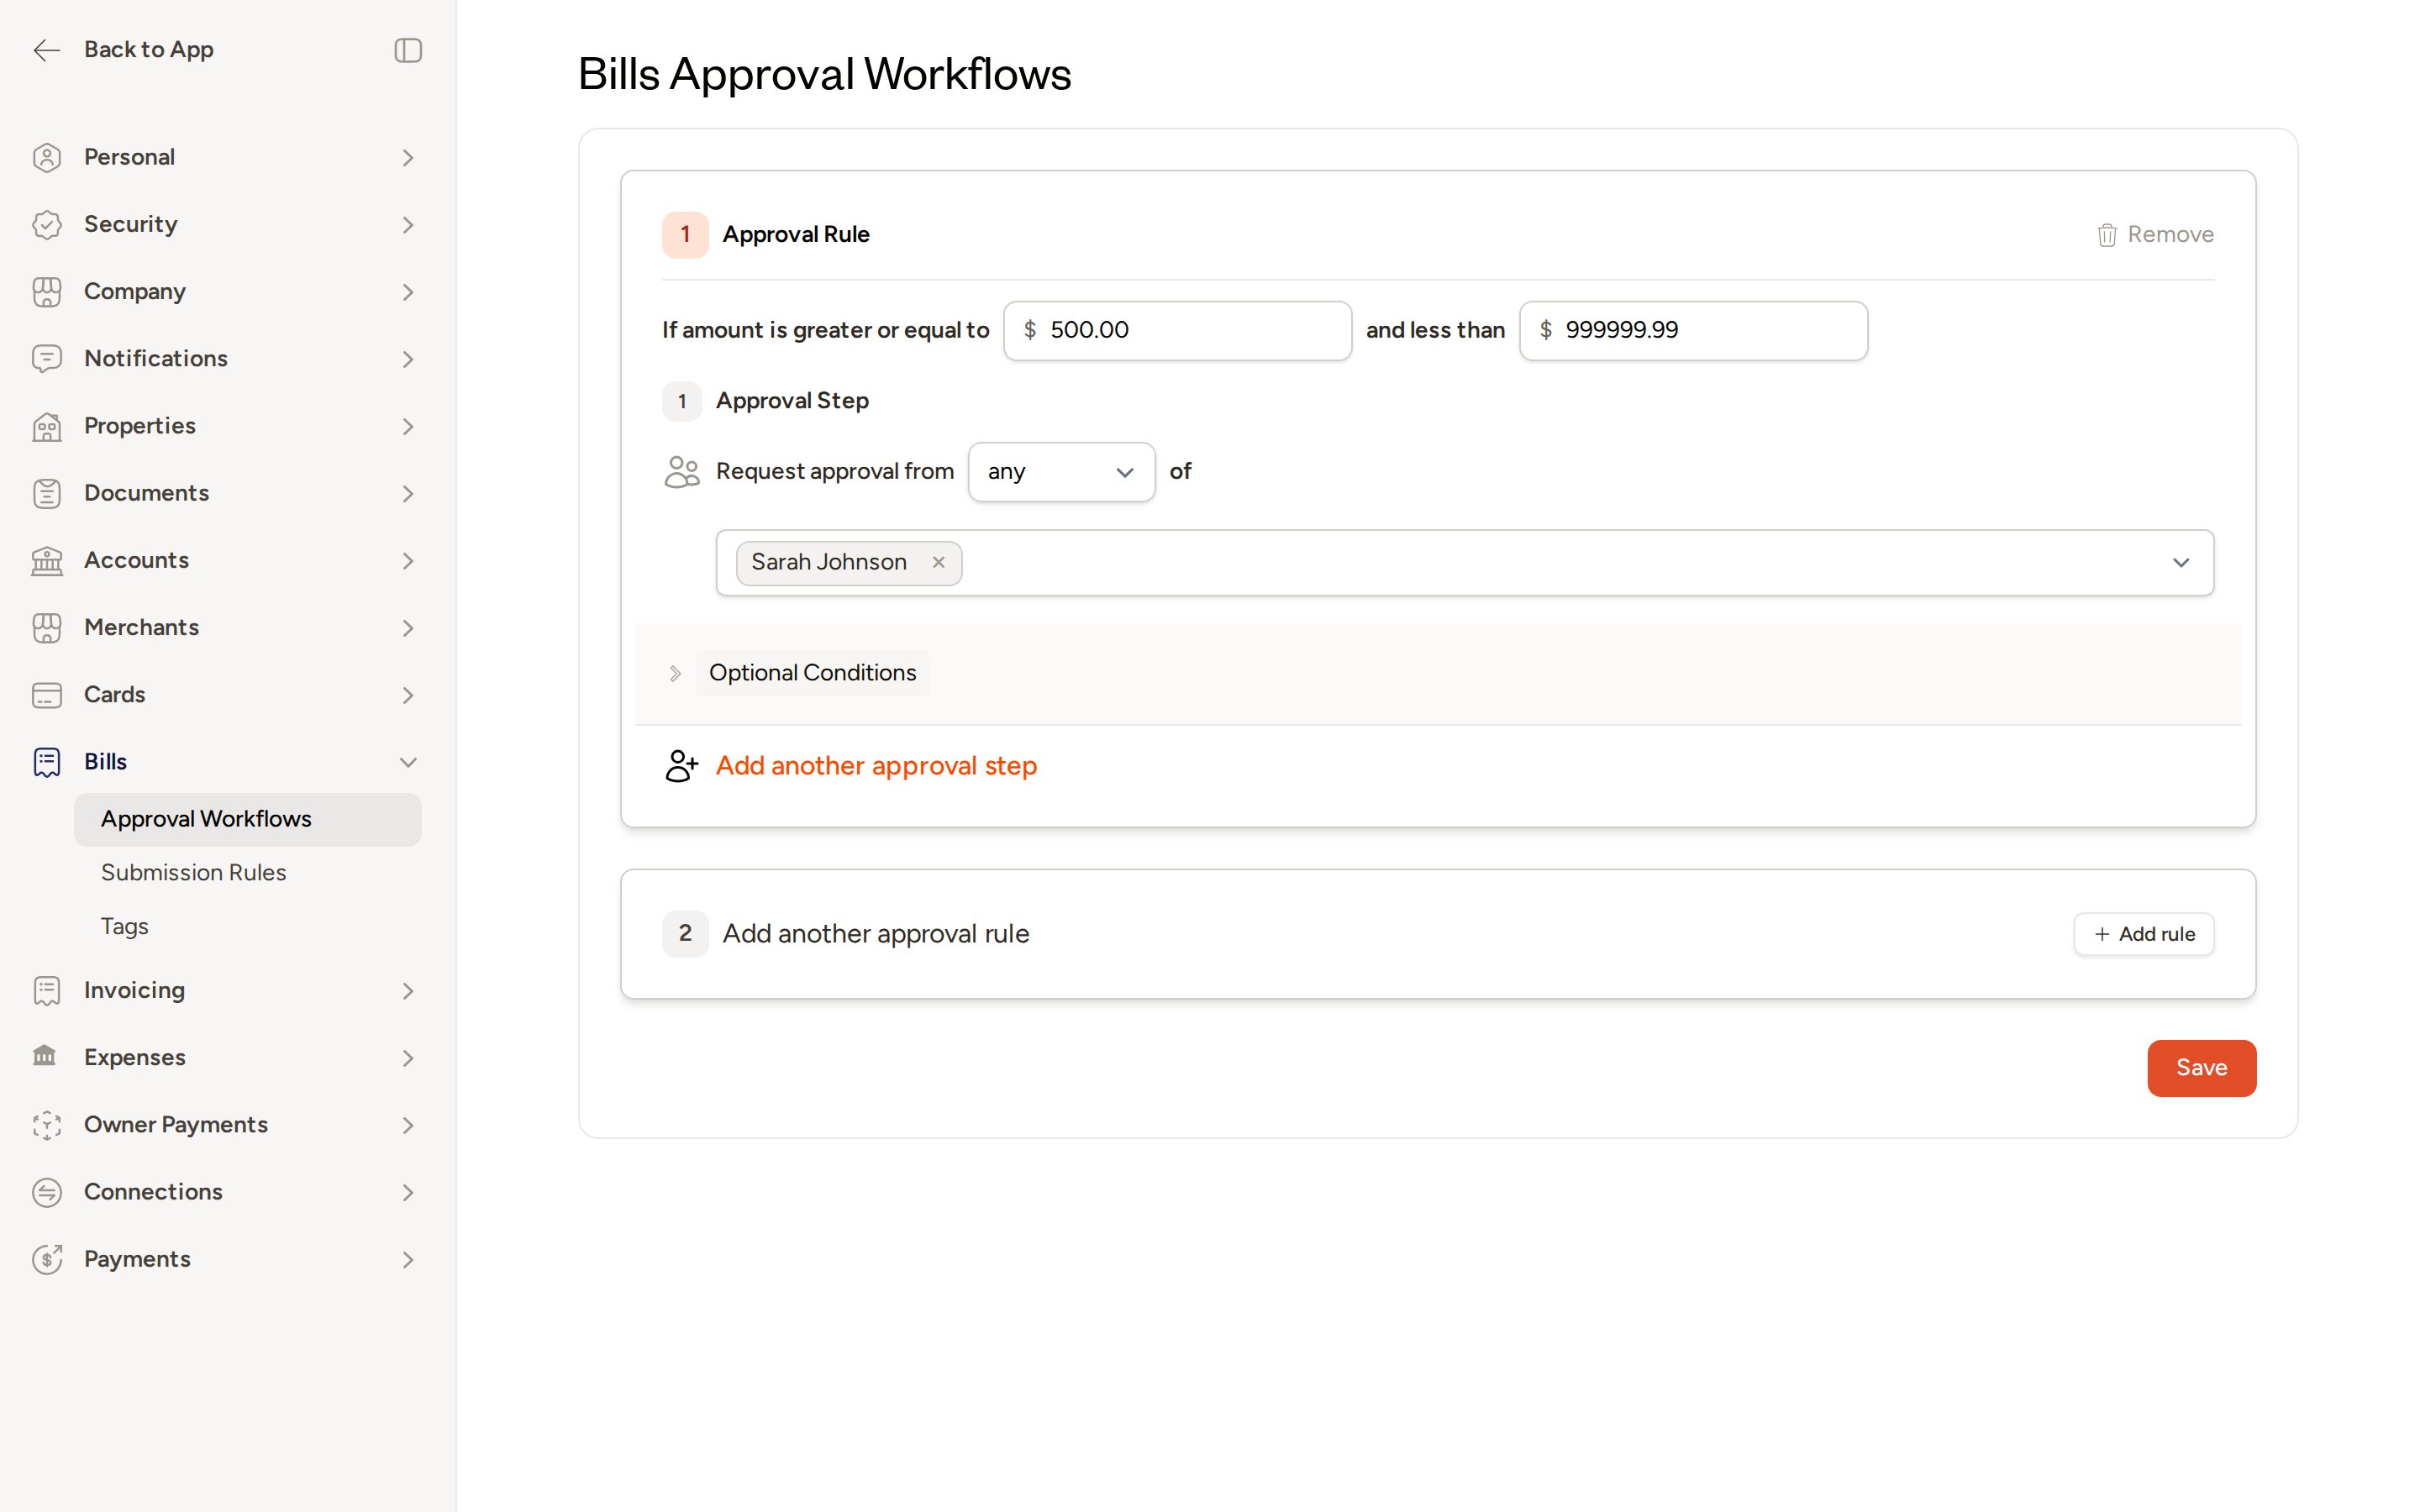
- On the Bills Approval Workflow page, locate the next available rule slot (labeled Add another approval rule) and click + Add rule.
- Set the amount range that triggers the rule:
- If amount is greater or equal to — Enter the minimum bill amount that activates this rule.
- and less than — Enter the upper bound, or leave it at the maximum value to apply the rule to all amounts above the minimum.
- Under Approval Step, configure who must approve:
- Use the Request approval from selector to choose either any (any one approver satisfies the step) or everyone (all listed approvers must approve).
- Use the approver selector to find and add one or more team members to this step.
- To add another sequential approval step within the same rule — for example, a manager approves after an accountant — click Add another approval step and repeat step 3.
- Optionally, expand Optional Conditions to scope the rule to specific criteria (see Optional Conditions below).
- Click Save when finished.
Start with a simple rule covering all amounts and assign a single admin as the approver. Once your team is comfortable with the flow, add more targeted rules with narrower conditions and thresholds.
Optional Conditions
Expanding the Optional Conditions section lets you restrict a rule so it only triggers when a bill meets specific criteria. Available conditions include:
- Vendor — Apply the rule only to bills from a particular vendor.
- Property — Apply the rule only to bills associated with a specific property.
- Property Group — Apply the rule to all properties within a group.
- Accounting Class — Apply the rule only to bills tagged with a particular accounting class.
A rule with no conditions set acts as a catch-all and applies to every bill that falls within its amount range.
Amount Thresholds
Amount thresholds let you route only significant bills through an approval process while letting small, routine invoices proceed without delay. For example:
- Bills under $500 — no approval required.
- Bills of $500 or more — require approval from a designated approver.
Set both the minimum and maximum values on each rule to define the range precisely.
Use amount thresholds so that small, routine bills aren't held up — reserve the approval requirement for larger or unusual invoices.
Approval Groups and Operator Logic
Each approval step contains a group of approvers and an operator that controls how their responses are evaluated:
- Any — Only one member of the group needs to approve to satisfy the step. When one person approves, the remaining members are notified that their input is no longer needed. Use this when you have a team of approvers and need coverage across time zones or during vacations.
- Everyone — Every member of the group must approve before the step is complete. Use this when unanimous sign-off is required.
You can add multiple approval steps within a single rule to model a sequential chain — for example, a property accountant approves first, then an operations manager approves second. Each step must be completed in order.
Removing a Rule
Click Remove in the top-right corner of any rule card to delete it. Click Save to apply the change.
What Happens When a Bill Needs Approval
Once a bill is submitted and matches one or more active approval rules, the following process begins:
- The bill moves to Pending Approval status and cannot be paid until all required approvals are collected.
- Each designated approver receives a notification — via email and/or in-app — prompting them to review the bill.
- Approvers can approve or reject the bill from the bill detail page or from their approvals queue.
- If a bill is rejected, the bill creator is notified and can edit and resubmit it.
- Once all required approvals across all matching rules have been collected, the bill becomes payable.
A bill must satisfy every matching rule before it is fully approved. If a bill triggers two rules, both must be completed independently before payment is allowed.
Bills Submission Rules
In addition to approval routing, you can configure what information is required before a bill can even be submitted. Navigate to Settings → Workflow Settings → Bills → Submission Rules to define mandatory fields such as:
- Property
- GL code
- Classification
- Accounting class
- Line-item amount matching
Submission rules ensure bills arrive at the approval step complete and consistent, reducing back-and-forth corrections.
Bill Tags
You can create, edit, reorder, and delete custom tags to help categorize and filter your bill records. Navigate to Settings → Workflow Settings → Bills → Tags to manage your tag list. Tags appear on bill records and can be used as filters when reviewing or exporting bills.
Owner Payment Request Approvals
Topkey also supports an approval workflow for owner payment requests, so disbursements to property owners require sign-off before funds are sent. To configure it, navigate to Settings → Workflow Settings → Approvals and select the Owner Payments tab. The configuration options — rules, amount thresholds, approvers, and conditions — work the same way as the bills workflow described on this page.
Frequently Asked Questions
What happens if I have multiple rules and a bill matches more than one? The bill must satisfy all matching rules before it can be paid. Each matching rule generates its own approval request, and all of them must be completed. This ensures every relevant approver has reviewed the bill regardless of which rule triggered first.
Can an approver approve their own bills? If the person who submitted a bill is also listed as a required approver for a matching rule, their submission can automatically satisfy their own approval step. This prevents unnecessary bottlenecks when a senior team member both creates and authorizes certain bills.
How do approvers get notified, and can they choose a digest instead of individual emails? Approvers receive email and in-app notifications when a bill is awaiting their review. Each approver can manage their own notification preferences — including opting into a scheduled digest email instead of per-bill notifications — by visiting /user/email_digests/edit and reviewing the Decision Required section.
If you have questions about configuring your approval workflow, Contact Support.