Inventory
Charges Report
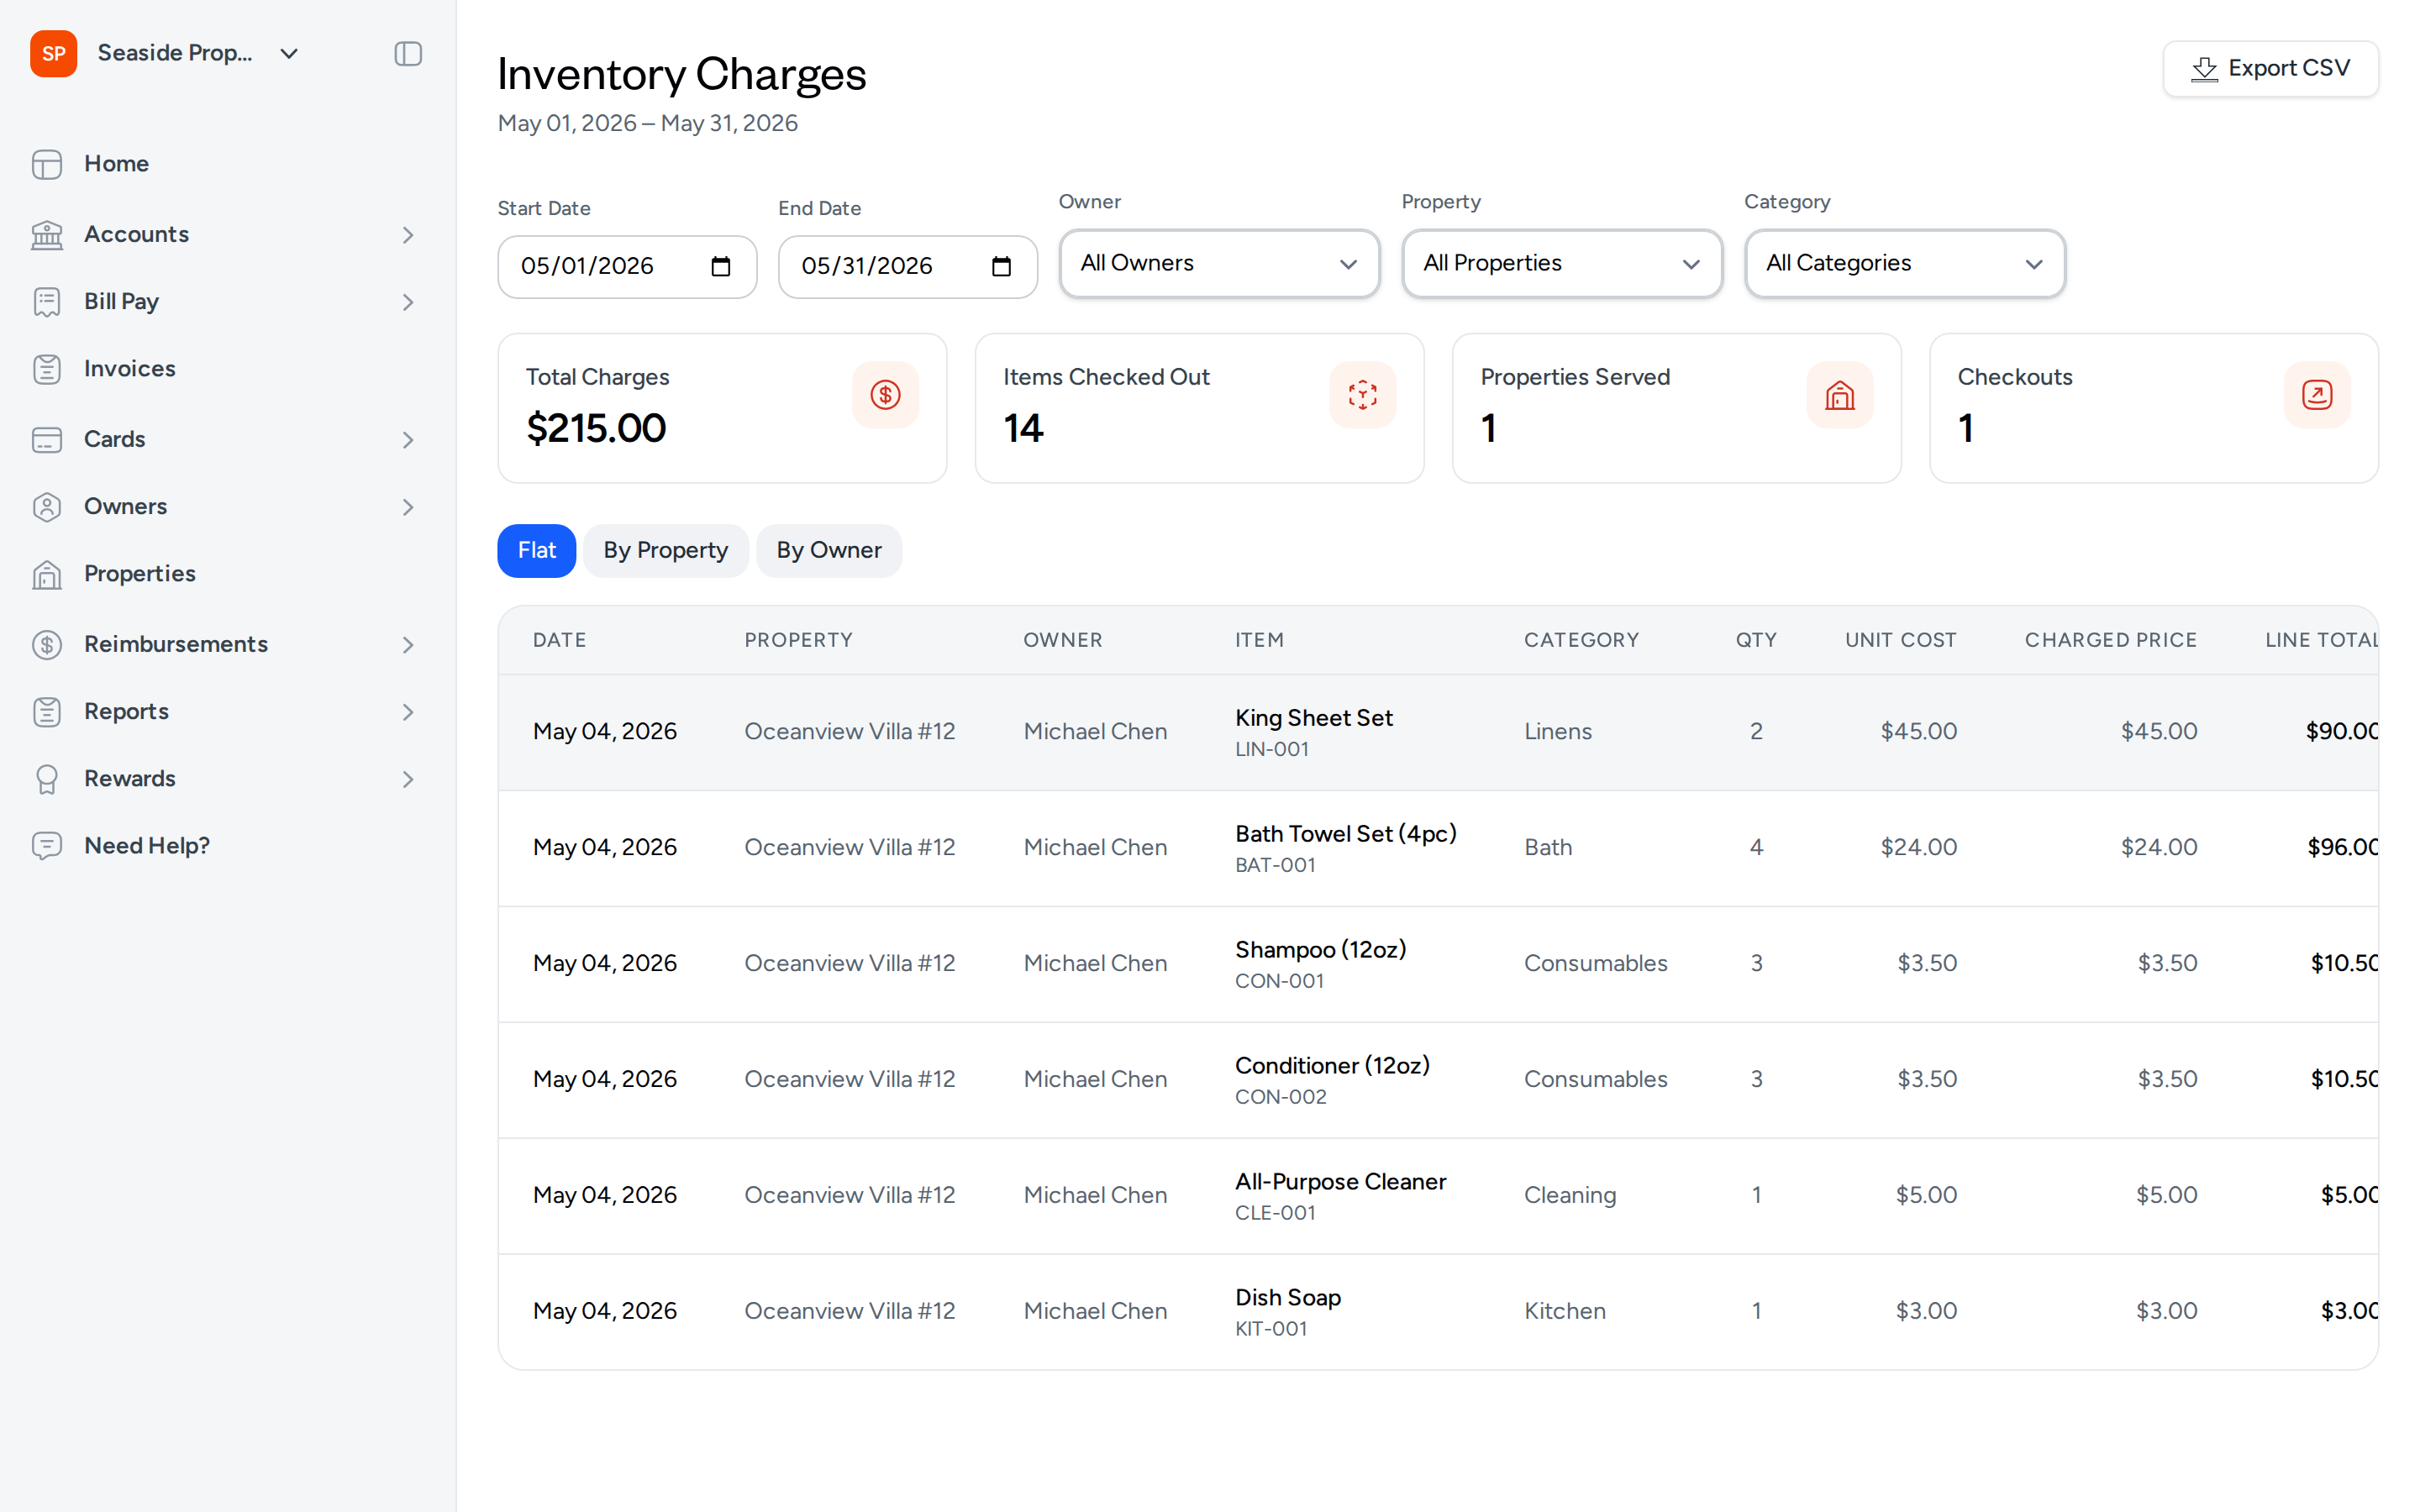
The Inventory Charges report gives you a detailed breakdown of every inventory item charged during checkouts across your properties. Use it to track expenses, review what was consumed at each property, and generate the data you need for owner billing.
Navigating to the Charges Report
- Go to Inventory in the left navigation.
- Select the Charges tab at the top of the page.
The report defaults to the current calendar month.
Filtering the Report
Use the filters at the top of the page to narrow down the charges you want to review. The report updates automatically when you change any filter.
- Start Date and End Date — Set the date range for the report. Only checkouts completed within this range are included.
- Owner — Limit the report to charges associated with a specific owner's properties.
- Property — Show charges for a single property only.
- Category — Filter by inventory category (for example, Linens or Cleaning Supplies).
You can combine filters to get very specific results — for example, filtering by both owner and category to see how much of a particular supply type was used across an owner's portfolio.
If you want to start over, select Clear All to remove all active filters.
Selecting an owner in the Owner filter automatically narrows the Property list to show only that owner's properties, making it easier to find the right property.
Summary Statistics
At the top of the report, four summary cards give you a quick overview of the filtered data:
- Total Charges — The combined monetary value of all charges in the current view.
- Items Checked Out — The total number of individual items dispensed across all checkouts.
- Properties Served — The number of distinct properties that received inventory.
- Checkouts — The total number of checkout events included in the report.
These figures update in real time as you change your filters or grouping.
Grouping Options
Below the summary cards, you can choose how the charge lines are organized. Select one of the three options:
- Flat — Displays all charge lines in a single chronological list with full pagination. This view also enables bulk selection for deleting multiple charges at once.
- By Property — Groups charge lines under each property, with a subtotal shown for each group.
- By Owner — Groups charge lines under each owner, with a subtotal shown for each group.
The grouped views are especially useful when preparing owner statements, since you can quickly see the total charged for each owner or property at a glance.
The Charges Table
Each row in the charges table represents a single line item from a checkout. The table includes the following columns:
- Date — The date the checkout was completed.
- Property — The property that received the items (hidden when grouped by property).
- Owner — The owner associated with the property (hidden when grouped by owner).
- Item — The inventory item name. If the item has a SKU, it appears below the name.
- Category — The category the item belongs to.
- Qty — The quantity of the item checked out.
- Unit Cost — The cost of the item recorded at the time of checkout.
- Charged Price — The price charged to the owner for one unit of this item. This may differ from the unit cost if a markup rule applies to the item or category.
- Line Total — The total charge for this line (quantity × charged price).
- Work Order — If the checkout line is linked to a work order, it appears here.
How Charged Prices Are Determined
The Charged Price for each line item is based on the charge price configured on the inventory item, adjusted by any markup rules that apply to that item or its category. This allows you to recover costs or build in a margin when billing owners for supplies used at their properties.
Deleting Charge Lines
If a charge was recorded in error, you can remove it directly from the report. Deleting a charge line automatically restores the deducted quantity back to the source warehouse, keeping your stock levels accurate.
Delete a Single Charge
- Locate the charge line you want to remove.
- Select the delete action for that row.
- Confirm the deletion when prompted.
The page refreshes and a confirmation message appears. If the charge is already gone (for example, because it was deleted moments earlier from another session), you will see a notice indicating it was already deleted.
Charge lines that are attached to a work order cannot be deleted from this report. You will see a message explaining that the charge is linked to a work order. To remove it, you must first detach it from the work order.
Bulk-Delete Multiple Charges
In the Flat view, you can select and delete multiple charge lines at once.
- Switch to the Flat grouping view.
- Use the checkboxes in the left column to select the lines you want to delete. Select the Select all checkbox at the top to select all visible lines at once.
- Once at least one line is selected, a toolbar appears showing the count of selected items.
- Select Delete in the toolbar and confirm when prompted.
After the bulk deletion, a summary message tells you how many charges were deleted and how many were skipped. Charges attached to work orders are automatically skipped and counted separately in the summary.
Stock is restored for every successfully deleted line. Charges that are skipped because they are attached to work orders are left unchanged.
Exporting the Report
You can export the current filtered view as a CSV file for use in spreadsheets or external billing workflows.
- Apply any filters or grouping you want reflected in the export.
- Select Export CSV in the upper right corner.
- The file downloads automatically with a filename that includes the start and end dates of your selected range.
Export filtered by owner to quickly produce a line-item summary for a specific owner's billing period.
Using the Charges Report for Billing and Expense Tracking
The Charges report is designed to support two primary workflows:
Owner billing — Filter by owner and set your billing period dates to see every charge attributable to that owner's properties. The By Owner grouping view and CSV export make it straightforward to pull this data into an invoice or owner statement.
Expense tracking — Filter by category or property to understand where supplies are being consumed and at what cost. The Unit Cost and Charged Price columns together help you monitor both your actual costs and what you are recovering through charges.
Frequently Asked Questions
Why does the Charged Price differ from the Unit Cost? The Unit Cost is what you paid for the item, while the Charged Price is what is billed to the owner. If a markup rule is configured for the item or its category, the charged price will be higher than the unit cost. If no markup applies, the two values will match.
What happens to stock when I delete a charge line? Deleting a charge line automatically reverses the stock deduction and returns the quantity to the warehouse it was originally pulled from. This keeps your inventory levels accurate without requiring a manual adjustment.
Can I delete charges that are attached to a work order? No. Charges linked to a work order are protected and cannot be deleted directly from the Charges report. They are skipped during bulk deletions and blocked during single deletions. To remove the charge, detach it from the work order first.