Work Orders
Editing a Work Order
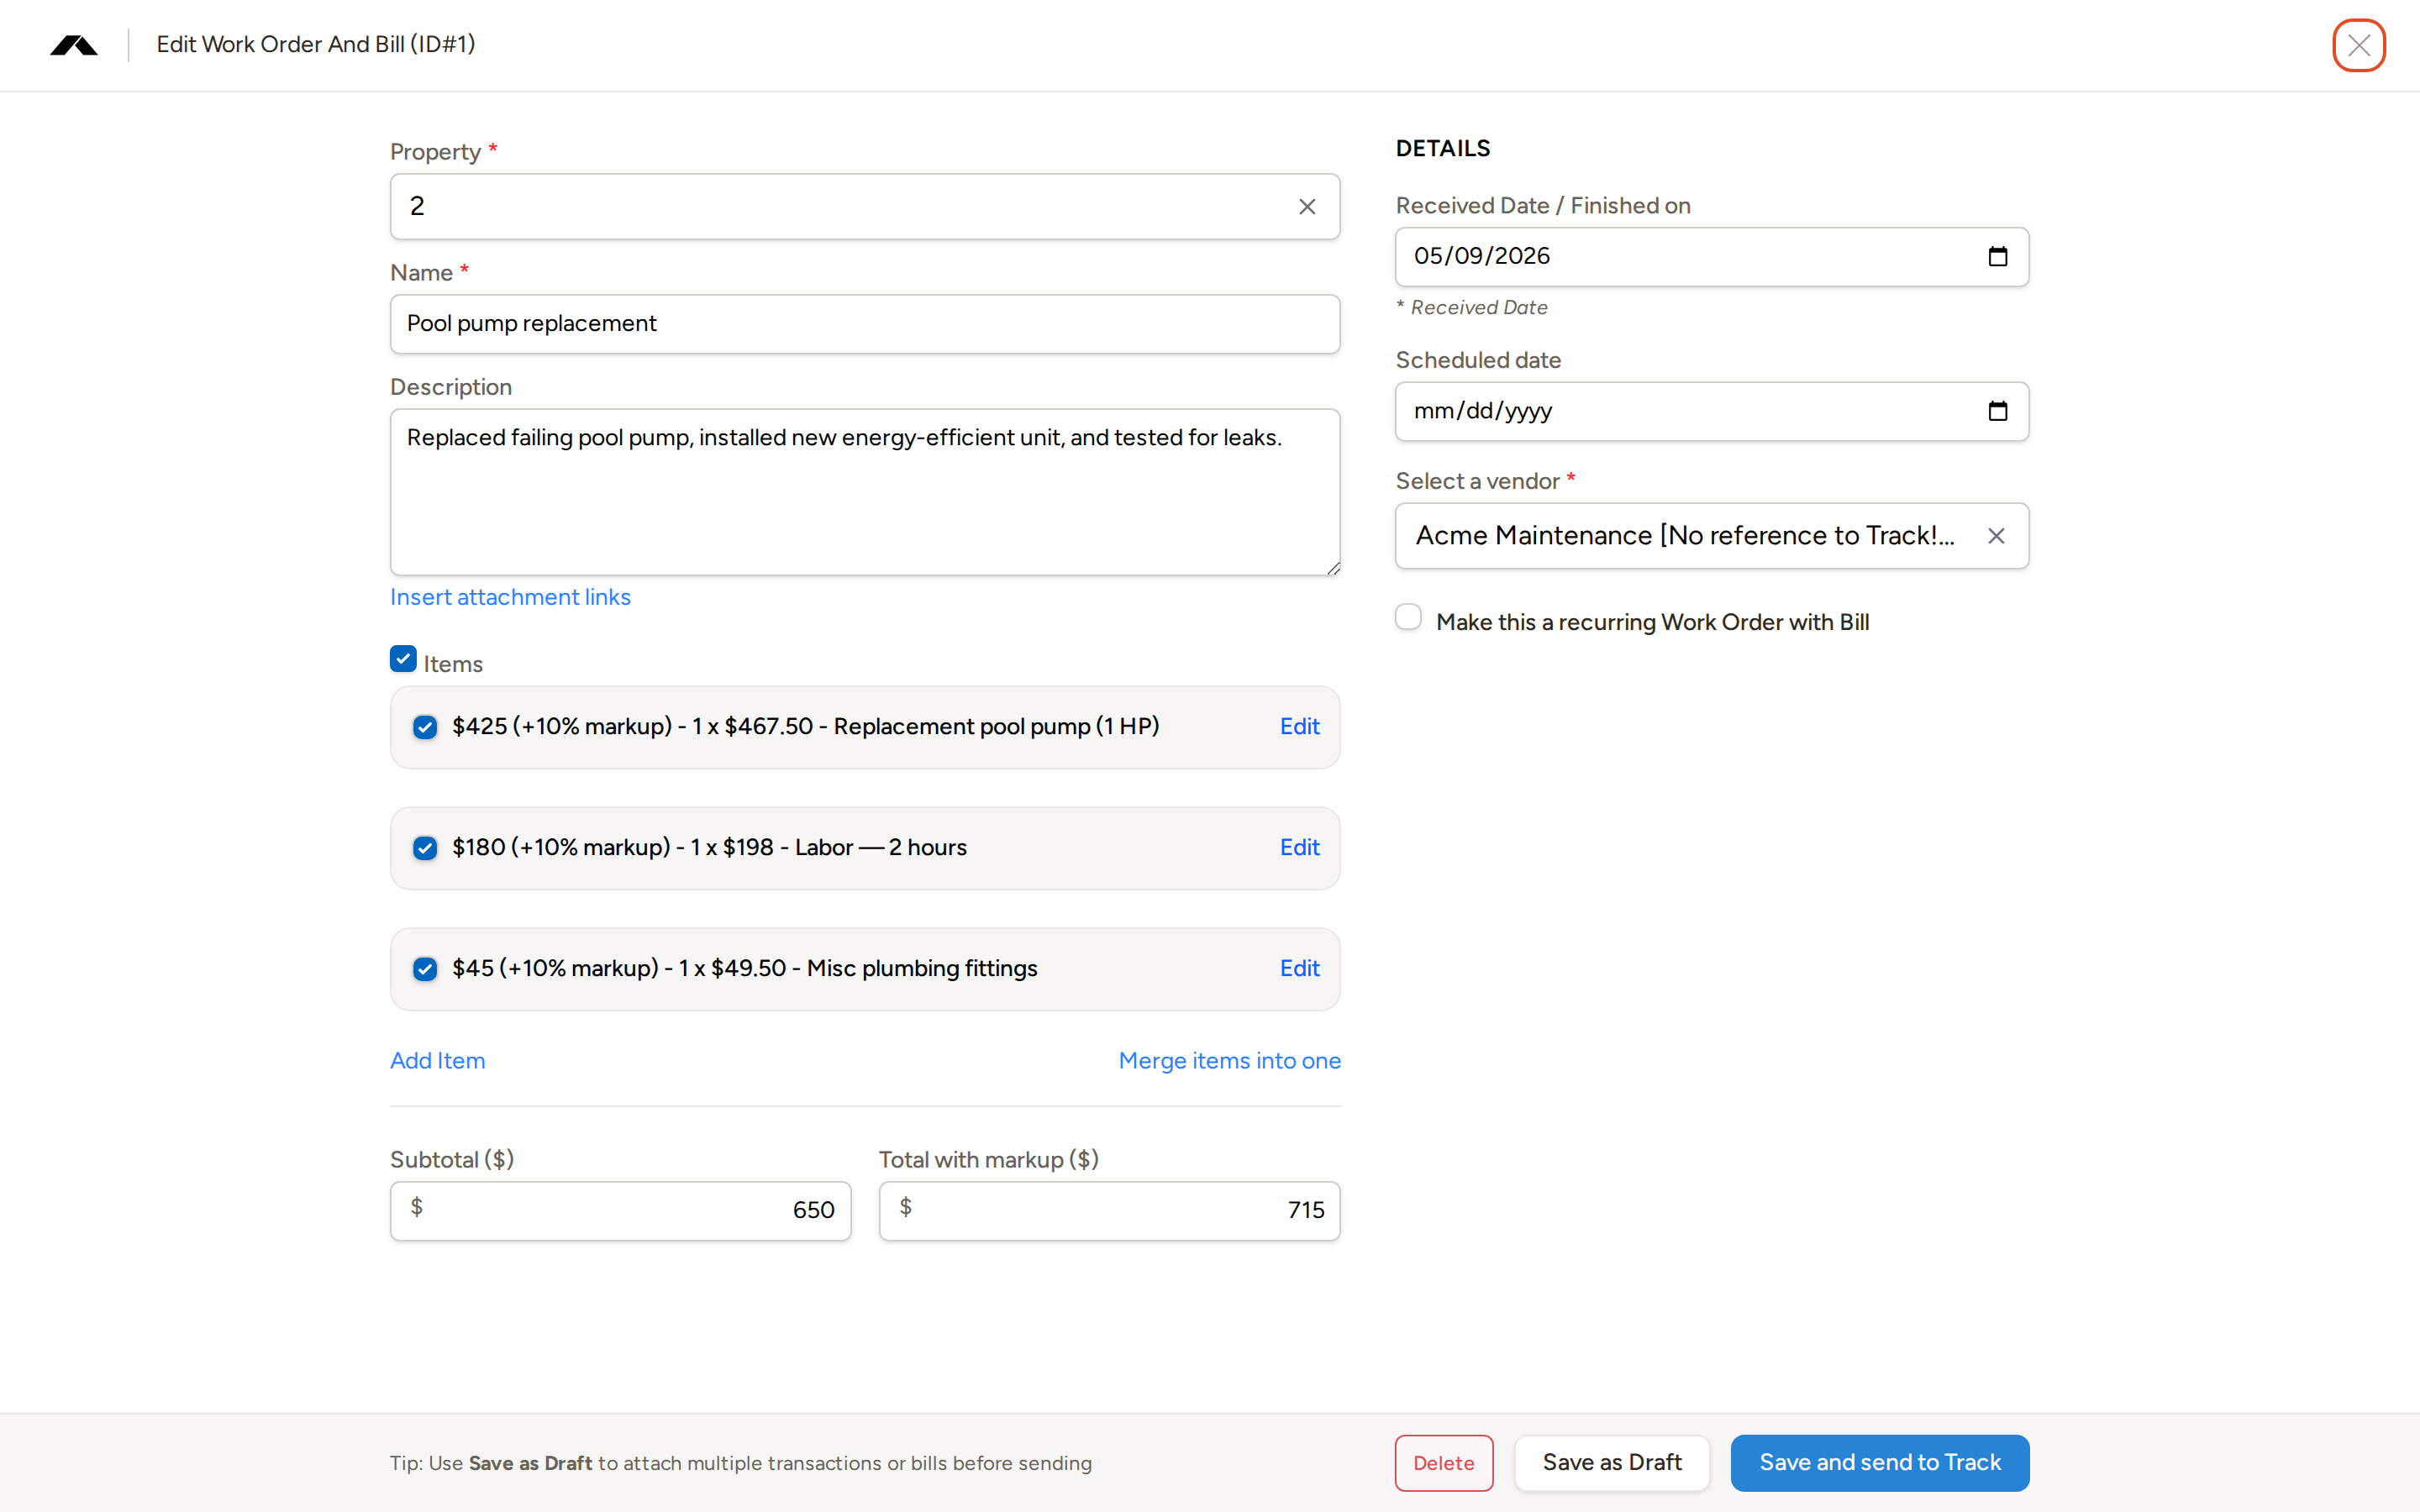
Topkey's core work order capability lets you create work orders directly in Topkey and push them to your property management system (PMS) — keeping your maintenance records, owner statements, and vendor billing all in one place. Work orders can also be imported automatically from your PMS or from task integrations like Breezeway, but pushing from Topkey outward is the primary workflow. This page walks through every field on the work order edit form so you know exactly what each setting does and why it matters.

Assign Property
The Property field links the work order to a specific rental property. Type part of the property name and select it from the list that appears. This field drives three important things: which owner gets billed when the work order is included in an owner statement, which markup rules apply (property-level markups take priority over account-level defaults), and how the work order appears in property-level reporting.
The Property field is required unless the work order is configured to bill directly to the owner rather than the property. If the property that was previously selected has since been removed from your account, Topkey will prompt you to choose a different one before you can save.
Assigning the correct property before adding line items ensures that any property-specific markup percentages are applied automatically as you build out the work order.
Name
The Name field is a short, descriptive title for the work order — for example, "Pool pump replacement" or "HVAC filter replacement." It appears in the work orders list so you and your team can identify the job at a glance. When you push the work order to your PMS, this name is included in the sync payload and typically displays in the PMS task list as well.
Keep names concise and consistent so they're easy to filter and export later.
Description
The Description field is a free-text area for longer notes about the work — what was done, what was found on site, or any context that helps you or the owner understand the job. Unlike the name, the description is intended as an internal working note, but it is also sent to your PMS as part of the sync payload when you push the work order.
Category
The Category field lets you classify the type of work being performed — for example, plumbing, landscaping, or cleaning. Assigning a category makes it easier to filter work orders by type on the work orders list and to break down maintenance costs by category in reporting.
Due Date
Use the Due Date field to record when the job needs to be completed. Setting a due date helps your team prioritize open work orders and makes it easier to track overdue items when reviewing the work orders list.
Assignees
The Assignees field lets you assign one or more team members to the work order. Assigned work orders are filterable by team member on the work orders list, and assignee information is included in CSV exports. This is useful when you want to track which team member is responsible for following up on or completing a job.
Labels
You can tag a work order with one or more Labels to support tag-based filtering and reporting. Labels are flexible — use them to group work orders by portfolio, priority level, project, or any other classification that fits your workflow.
Adding Lines
Line items capture the individual costs that make up the work order total. Click Add Item to add a new line. Each line has a type — either Part/Cost or Labor — which determines what fields appear.
- Part/Cost lines capture a description and a flat amount. When the work order is connected to an integration that provides quantity and unit cost data, those fields may also be populated automatically.
- Labor lines capture a description, an hourly rate, and labor time broken out into hours and minutes. Topkey calculates the line amount automatically from the rate and time you enter — you do not enter a flat dollar amount for labor lines.
The Part/Cost vs. Labor type selector appears when the work order is connected to Streamline or when the work order already contains a labor-type line. Lines can be added or removed inline at any time, and each line rolls up into the subtotal shown at the bottom of the items section.
You can also log inventory item usage by adding inventory lines. Select the inventory item, enter a count and unit price, and Topkey calculates the total amount for that line automatically.
You can click Merge items into one to combine all existing line items into a single consolidated line. This is useful when you want to present a single total to the owner rather than an itemized list.
Markups
When a markup applies to the work order, Topkey displays an adjusted "with markup" amount alongside each line item, and shows a separate Total with markup ($) at the bottom of the items section (in addition to the base Subtotal ($)).
Markup percentages resolve in this order of priority:
- A per-GL-code markup configured on the property (when this feature is enabled for your account)
- A property-wide markup percentage set on the property record
- The account-level default work order markup percentage
When a markup is in effect, the amount shown on each line reflects the marked-up value, and the totals section shows both the pre-markup subtotal and the markup-inclusive total side by side.
Dates
The Details panel on the right side of the edit form contains two date fields.

- Received Date / Finished on — This is the business date Topkey uses to assign the work order to the correct owner statement period and to drive date-based reporting. Set this to the date the work was actually performed or completed. For work orders that come in from Breezeway, Topkey also surfaces the date the task was marked finished in Breezeway.
- Scheduled date — Use this optional field to record when the work is expected to take place, separate from the date it was actually received or completed.
The Received Date / Finished on date is what determines which owner statement period a work order falls into. Make sure this date reflects when the work actually occurred, not when the work order was created in Topkey.
Vendor
The Select a vendor field in the Details panel links a vendor to the work order. Type to search for a vendor and select one from the list. The selected vendor is used in two ways: it pre-populates the vendor when you convert the work order into a bill, and it is pushed to the PMS vendor field when you sync the work order.
Topkey may automatically suggest a vendor based on rules configured for the selected property. You can override the suggestion at any time by selecting a different vendor.
For posting purposes, a vendor must exist in both Topkey's vendor list and your connected PMS. A vendor present in only one system cannot be used for posting.
Recurring Work Order
To generate this work order automatically on a schedule, check Make this a recurring Work Order (the label may include your work order type, such as "Work Order with Bill"). Once checked, a frequency section appears with the following options:
- Weekly — Topkey creates a new work order each week on the same day of the week as the original.
- Monthly — Topkey creates a new work order each month on a specific day of the month that you choose (any day from 1 to 28).
- Yearly — Topkey creates a new work order each year on the same day and month as the original.

Each time the schedule runs, Topkey creates a fresh copy of this work order — including its line items — as a new draft. The original work order acts as the template.
Recurring schedules are ideal for regular maintenance tasks like monthly HVAC filter changes or weekly pool service. Use the monthly day-of-month option to align recurring work orders with your owner statement cycle.
Push to PMS
Pushing work orders to your PMS is one of Topkey's most valuable capabilities — it lets you create and manage work orders in Topkey and sync them outward to your PMS, keeping both systems aligned without manual re-entry.
When a work order has been saved and is attached to a PMS-connected property, the option to send it to your PMS becomes available. You can trigger the sync from the individual work order view, or send multiple work orders at once using the bulk action from the work orders list.

After a successful sync, Topkey records the date and time the work order was sent along with a copy of the full payload in the audit log. You can review this history at any time to verify exactly what was sent to your PMS.
Work orders imported automatically from your PMS (or synced in from Breezeway) complement the push-to-PMS workflow. However you get work orders into Topkey, you can always edit them and push updates back out to your PMS.
Additional Actions
Attaching a Transaction or Bill to an Existing Work Order
Instead of creating a new work order from scratch, you can attach an existing transaction or bill to a work order that's already been saved. From the transaction or bill row, click Attach and select the work order you want to link. The attachment sources available are:
- A draft work order that was imported from your PMS
- An existing draft work order you already created in Topkey
- A record from Breezeway or SuiteOp
Creating Work Orders in Bulk
If you have multiple transactions or bills that each need their own work order, select them on the transactions or bills list and use the Create Multiple button. Topkey generates a separate work order for each selected record in one step.
Converting a Work Order into a Vendor Bill
Once a work order is complete, you can convert it directly into a vendor bill. Use the Create Bills bulk action from the work orders list, or use the Pay Vendor flow from within the individual work order. You can also opt to auto-generate a PDF invoice as part of this process.
Viewing Work Order History
To see the full change history of a work order — including every edit, sync attempt, and status change — open the work order's action menu and select Task History. The history modal shows a timestamped log of all activity so you can audit exactly what happened and when.
Manually Changing Work Order Status
If you need to move a work order back to draft or forward to saved outside of the normal workflow, open the action menu on the work order. From there you can use Convert to Draft to revert the work order, or Mark as Saved to manually advance it. These actions are useful when correcting a work order that was saved prematurely or when you need to re-edit a finalized record.
Frequently Asked Questions
What happens if I don't assign a property to the work order? The Property field is required for most work orders. Without a property assignment, Topkey cannot determine which owner to bill, which markup rules to apply, or how to route the work order in your PMS. You'll be prompted to select a property before saving.
Can I edit a work order after it has been pushed to my PMS? Yes. You can edit a saved work order and push the updated version to your PMS again. Topkey records each sync in the audit log, so you can always check what was sent and when by reviewing the Task History from the work order's action menu.
Why is my vendor not available to select on the work order? For posting purposes, a vendor must exist in both Topkey's vendor list and your connected PMS. If a vendor appears in Topkey but not in your PMS (or vice versa), it won't be usable for syncing. Contact your PMS administrator to ensure the vendor exists in both systems, or reach out to Contact Support for help.