Inventory
Stock Levels & Catalog Items
The Stock Levels page is your central view for everything in your inventory catalog — what you have, where it's stored, and what needs to be reordered. From here you can add new items, adjust quantities on the fly, and keep your catalog organized with categories.
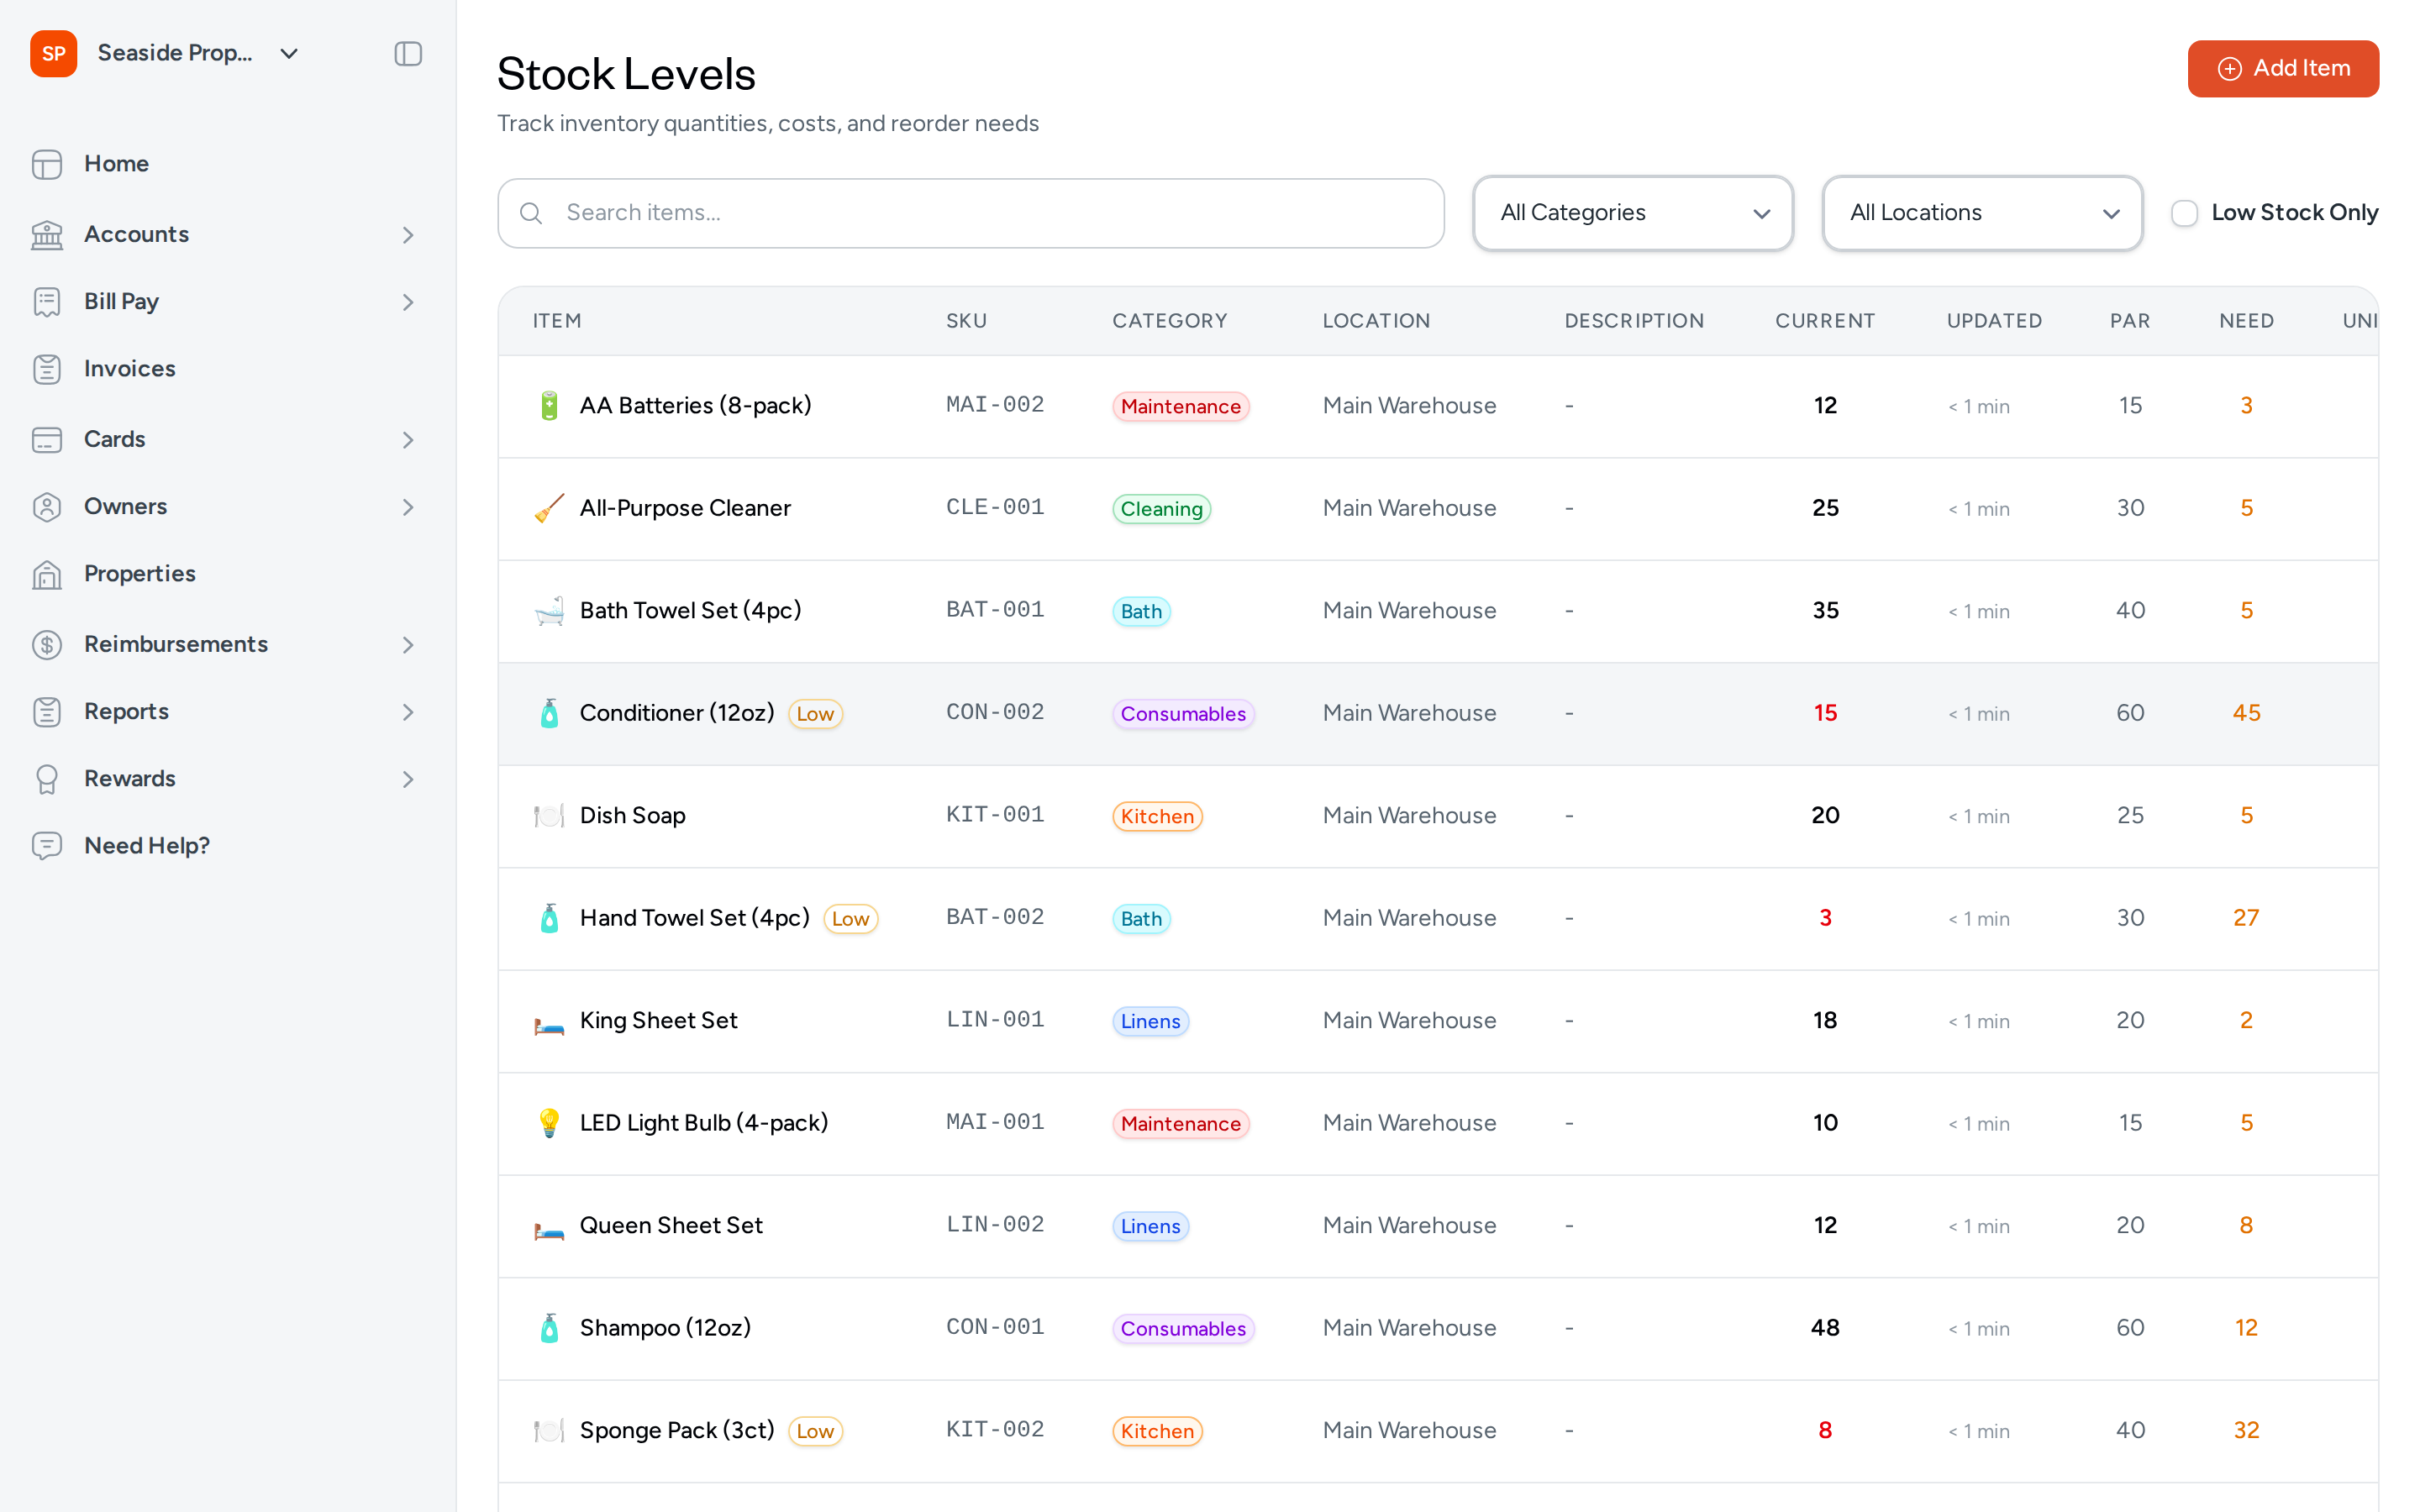
The Stock Levels List
The list shows every active catalog item along with key details for each location where stock is tracked:
- Item — The item name, emoji, and SKU. A Low badge appears when the item's total quantity has fallen to or below its reorder point.
- Category — A color-coded label such as Linens, Bath, Kitchen, Cleaning, or Consumables.
- Location — The warehouse or storage location holding this stock.
- Current — The quantity currently on hand at that location. Items at or below their reorder point appear in red.
- Updated — When the quantity was last changed and the reason (for example, "adjustment").
- Par — The target quantity you want to maintain.
- Need — How many units are needed to reach the par level. This updates automatically as you adjust stock.
If an item is stocked across multiple locations, it appears as a separate row for each location so you can see the per-location breakdown at a glance.
Searching and Filtering Items
Use the search bar and filters at the top of the Stock Levels page to narrow down what you see:
- Search — Type any part of an item name or SKU to find matching items instantly.
- All Categories — Filter the list to show only items belonging to a specific category.
- All Locations — Filter to show only items stored at a particular warehouse location.
- Low Stock Only — Toggle this on to see only items whose total quantity is at or below their reorder point.
You can combine filters — for example, filter to the "Bath" category at your "Main Warehouse" location to focus on exactly what you need to restock.
Adding a New Catalog Item
Click Add Item in the top-right corner of the Stock Levels page to open the Add Catalog Item form.
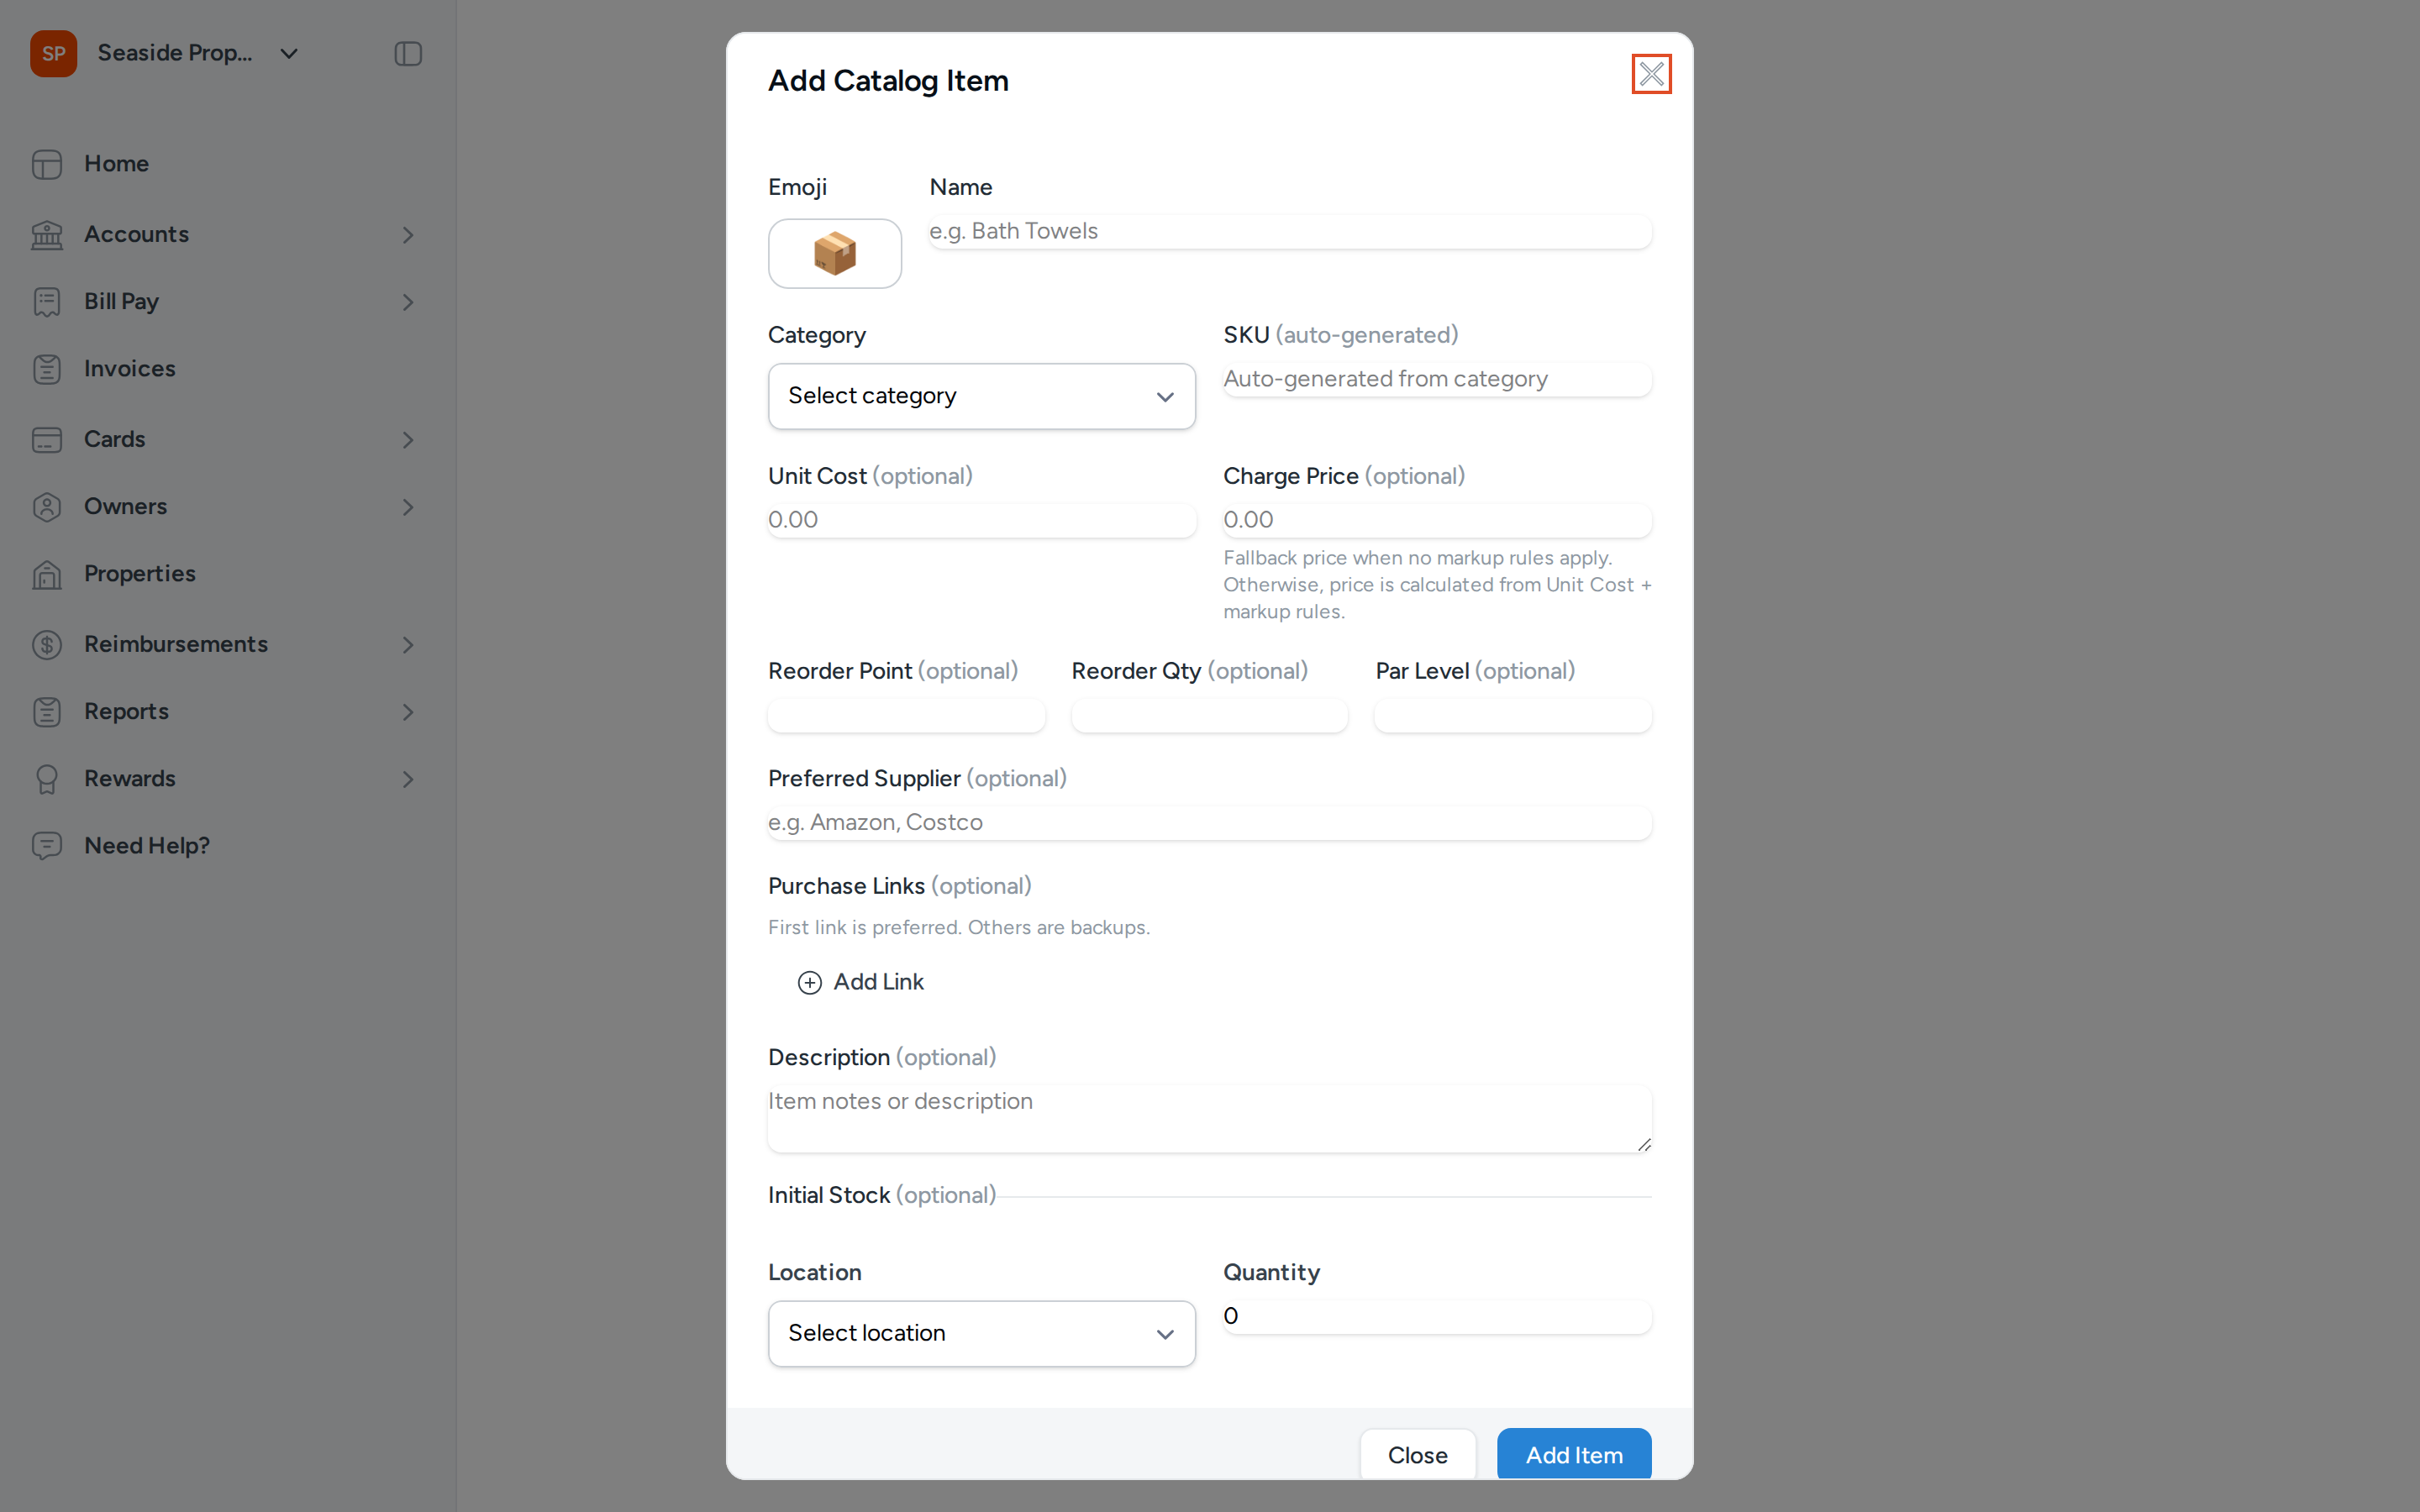
Identity
- Emoji — Choose an emoji to visually identify the item in lists and checkouts. If you leave this blank, Topkey uses the emoji set on the item's category, or a default box icon.
- Name (required) — Enter a clear, descriptive name for the item, such as "Bath Towel Set (4pc)".
- Category — Assign the item to a category (for example, Linens, Bath, Kitchen, Cleaning, or Consumables) to keep your catalog organized and filterable.
- SKU — A unique identifier for the item. If you leave this blank, Topkey automatically generates one based on the category (for example,
BAT-001for a Bath item). You can type your own SKU if you prefer.
Pricing
- Unit Cost (optional) — What you pay per unit when purchasing this item. Used to calculate the total inventory value shown in the list.
- Charge Price (optional) — The price charged when this item is used in a checkout. This acts as a fallback when no markup rules apply; otherwise the price is calculated from the unit cost plus any applicable markup rules.
Reorder Settings
These three fields work together to help you stay on top of stock levels:
- Reorder Point (optional) — The total quantity across all locations at which the item is flagged as low stock. When the item's combined quantity falls to this number or below, a Low badge appears and the quantity is highlighted in red.
- Reorder Qty (optional) — How many units you typically order at a time when restocking. This is for your reference when placing purchase orders.
- Par Level (optional) — The quantity you want to have on hand at all times. The Need column in the list shows how many units are required to reach this level.
Additional Details
- Preferred Supplier (optional) — Record the vendor you typically buy this item from (for example, Amazon or Costco).
- Purchase Links (optional) — Add one or more URLs that link directly to the product listing for reordering. The first link is treated as the preferred source; additional links serve as backups. These appear as a quick-access link icon next to the item name in the stock list.
- Description (optional) — Any notes about the item, such as specifications or usage instructions.
Initial Stock
If you want to record existing stock when creating the item, use the Initial Stock section:
- Select a Location from the list.
- Enter the Quantity currently on hand at that location.
This sets the starting stock level immediately when the item is saved. You can always adjust quantities later.
Click Add Item to save the new catalog item.
You only need to fill in Name to create an item. All other fields are optional and can be added or updated later by editing the item.
Importing Items in Bulk
If you have a large number of items to add, you can import them all at once using a CSV file instead of entering each one manually.
- On the Stock Levels page, look for the import option and download the pre-formatted CSV template. The template includes all supported columns with the correct headings so your data maps correctly on import.
- Fill in the template with your item data — name, category, SKU, unit cost, reorder settings, and any other details you want to include.
- Upload the completed CSV file.
- Review the import preview before confirming. The preview shows exactly which items will be created so you can catch any errors.
- Optionally, select a destination warehouse location to assign initial stock quantities from the import file to that location.
- Confirm the import to add all items to your catalog.
Use the downloadable template rather than creating your own CSV from scratch. This ensures the column names match what Topkey expects and avoids import errors.
Editing an Existing Item
To update any details on a catalog item:
- Click the item's name in the stock list. The edit panel opens.
- Update any fields — name, category, pricing, reorder settings, purchase links, or description.
- Save your changes.
All changes take effect immediately and are reflected in the stock list.
Adjusting Stock Quantities
You can update stock quantities directly from the Stock Levels list without opening the edit form. Each row has controls in the Current and adjust columns.
Increment or Decrement by One
Use the − and + buttons at the end of a row to decrease or increase the quantity at that location by one unit at a time. The row updates immediately after each click.
Set an Exact Quantity
Click directly on the quantity number in the Current column. The number becomes an editable field — type in the exact quantity you want and press Tab or click away. Topkey saves the new value automatically.
Stock quantities cannot go below zero. If you decrement to zero or enter a negative number, the quantity is saved as zero.
Understanding Low Stock Indicators
The Low badge and red quantity text are triggered automatically when an item's total stock across all locations falls to or below its Reorder Point.
- If no reorder point is set for an item, it will never be flagged as low stock.
- The Need column shows how far below the par level the item is — this is separate from the reorder point and reflects how much you would need to order to be fully restocked.
- Use the Low Stock Only toggle to quickly pull up every item that needs attention at once.
Set a reorder point for any item you need to keep in stock consistently. Even a conservative number like 5 or 10 ensures you get a visual warning before you run out completely.
Managing Categories
Categories help you organize your catalog and make filtering faster. You manage categories from the Inventory settings page rather than from the stock list itself.
From Settings → Inventory Categories, you can:
- Create a new category — Give it a name and optionally an emoji. New categories immediately become available when adding or editing items.
- Rename a category — Updating a category's name automatically updates every item that uses it, so your catalog stays consistent without any manual edits.
- Archive a category — Archiving removes the category from the selection list for new items. Existing items retain their category label but the category is no longer available for new assignments.
- Reorder categories — Drag categories into the order you want them to appear in filters and selection lists.
Renaming a category updates all items using that category immediately. Double-check the new name before saving to avoid unintended changes across your catalog.
Frequently Asked Questions
What happens if I leave the SKU blank when adding a new item? Topkey automatically generates a SKU based on the item's category. For example, a Bath item might receive the SKU BAT-001. The generated SKU increments automatically so each item has a unique identifier. You can override this by typing your own SKU into the field before saving.
What is the difference between Reorder Point and Par Level? The reorder point is the quantity that triggers a low stock warning — it tells you when to act. The par level is the quantity you want to have on hand — it tells you how much to order. For example, if your par level is 40 and your reorder point is 10, you will see a Low badge when stock drops to 10, and the Need column will show that you need 30 units to get back to 40.
Can I track the same item across multiple locations? Yes. Once an item exists in your catalog, you can record stock for it at any of your active warehouse locations. Each location appears as its own row in the stock list, and the reorder point is evaluated against the combined total across all locations.
Questions? Contact Support