Admin
Credit Card Approval Workflows
Credit card approval workflows let you require one or more designated approvers to review card transactions before they are finalized or synced to your accounting or property management system. Use this feature to prevent unauthorized spend and maintain a clear audit trail of who approved each charge.
Getting There
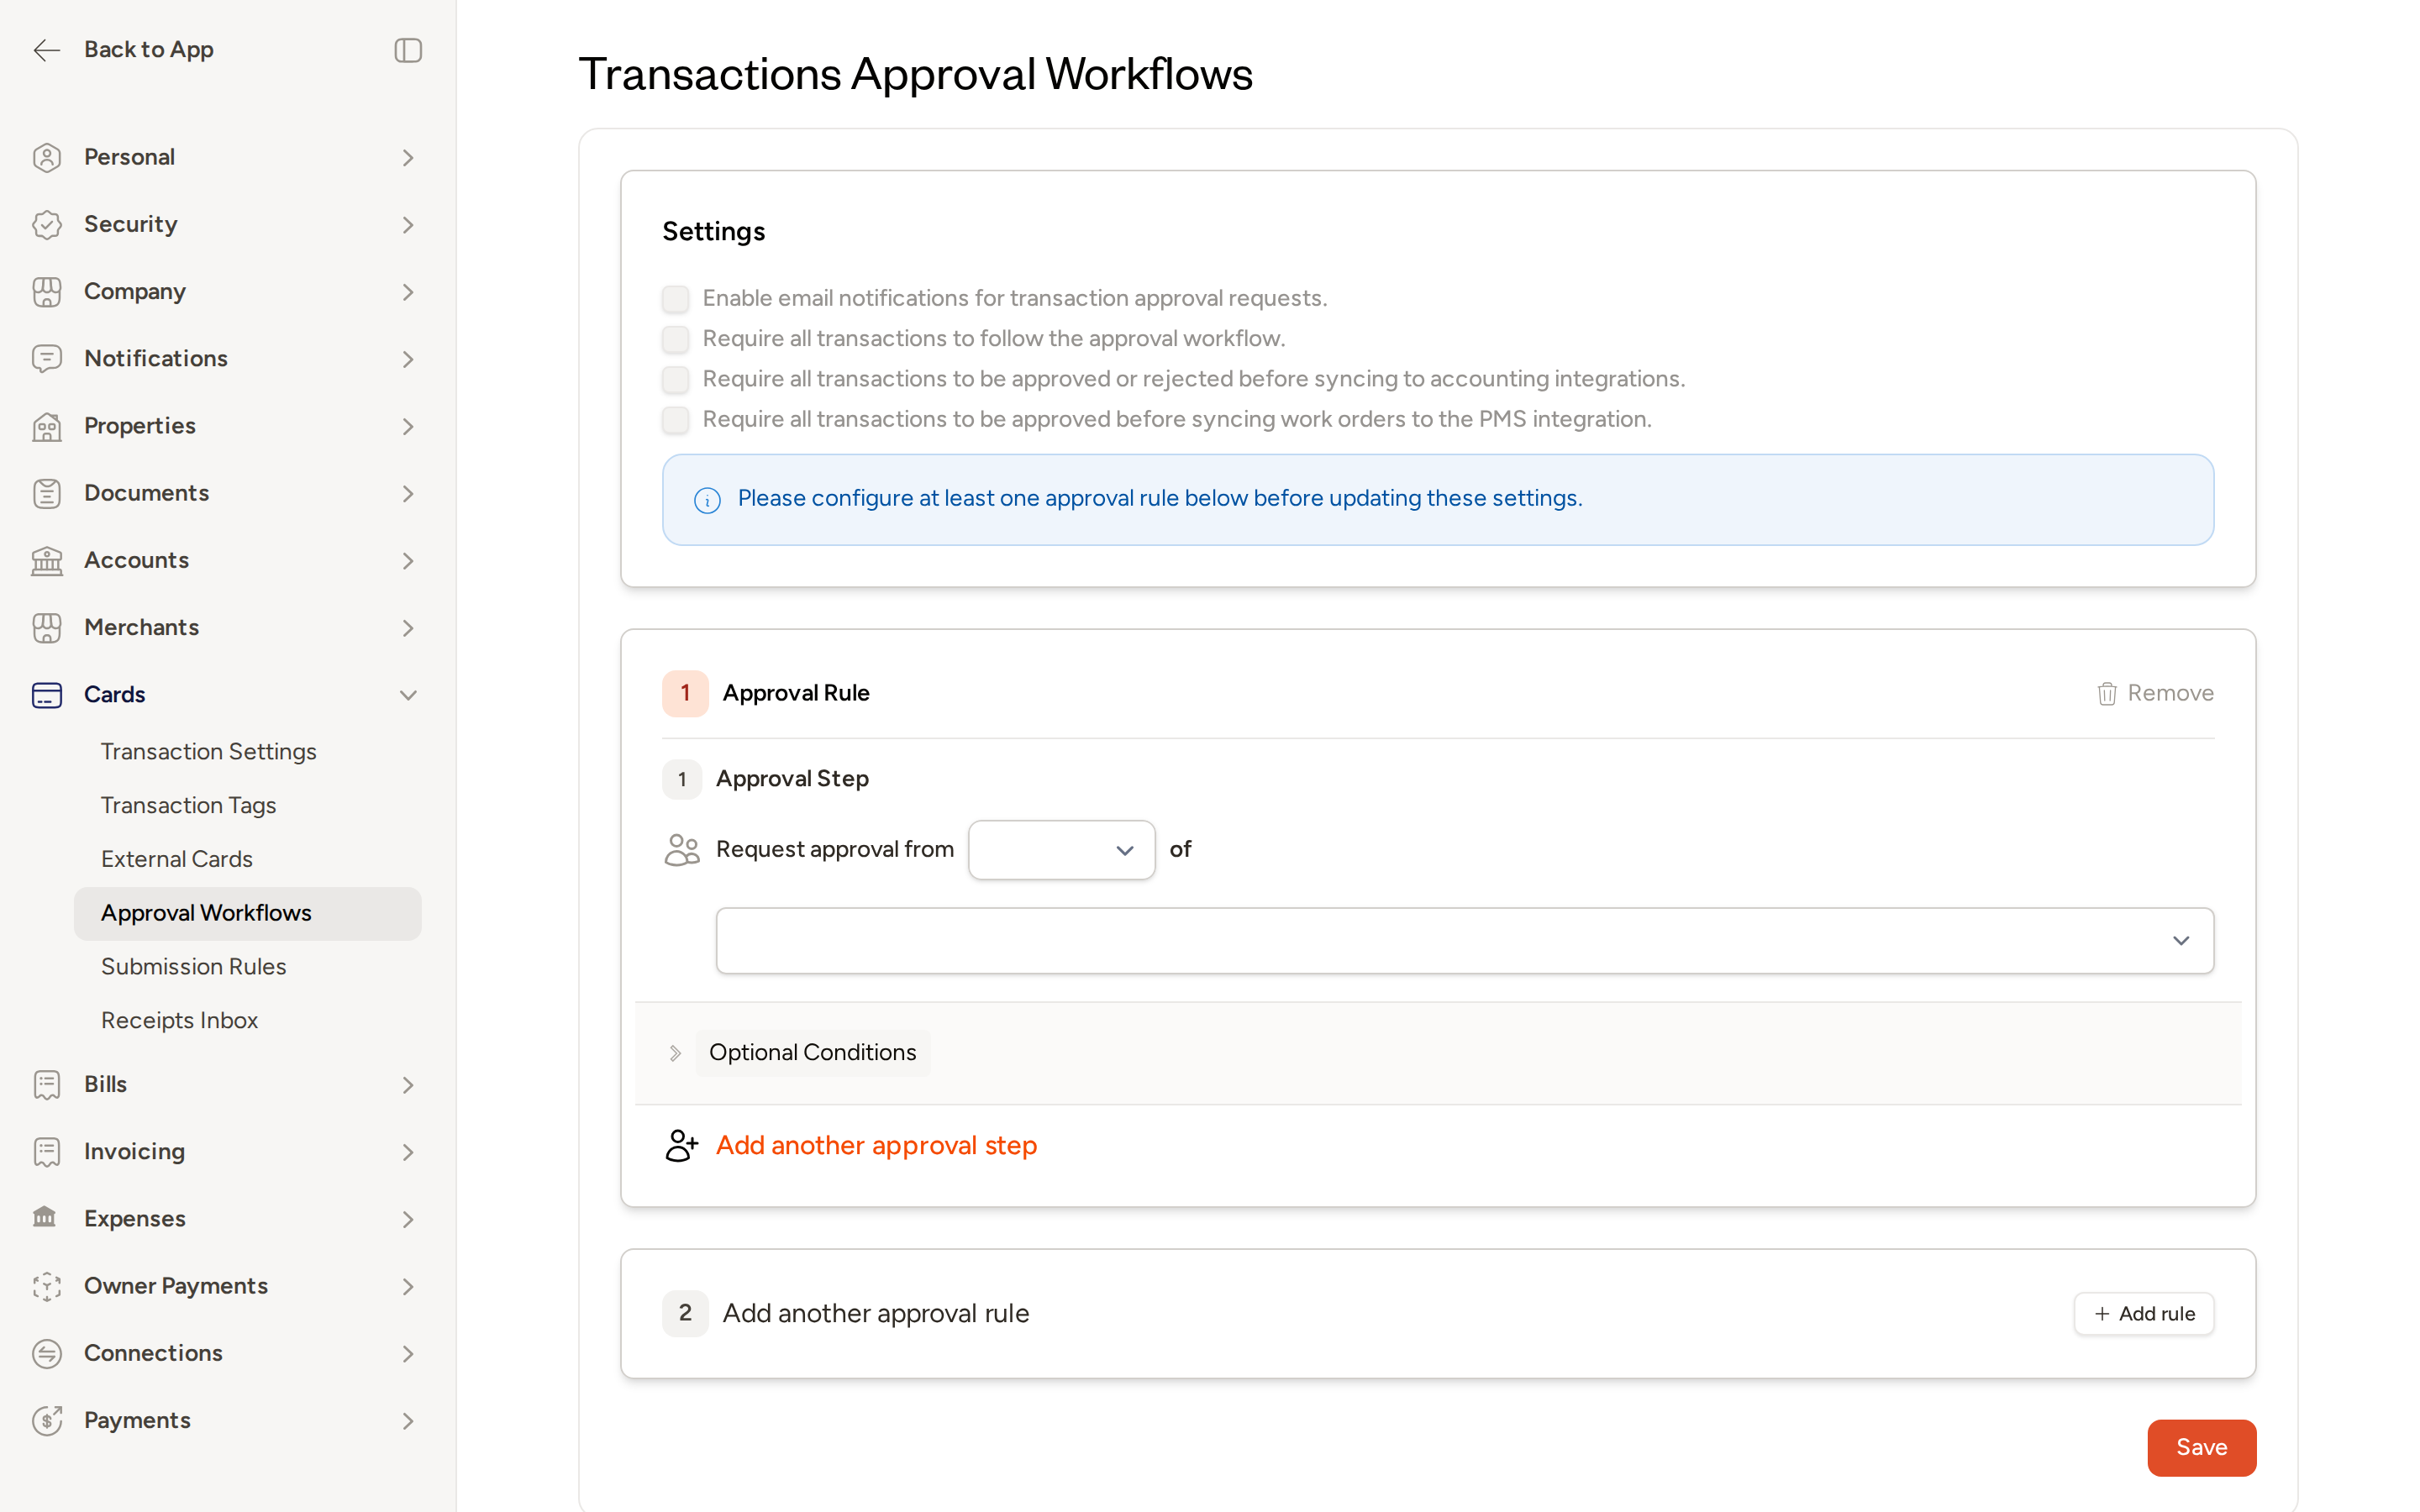
Navigate to Settings → Workflow Settings → Approvals → Transactions to open the Transactions Approval Workflows page.
You must configure at least one approval rule before the account-level settings toggles can be saved. The page will display a reminder if you attempt to enable settings before a rule is in place.
Account-Level Settings
The Settings section at the top of the page contains four toggles that control how the approval workflow behaves across your entire account.
Require Approval
When this toggle is on, every new card transaction must go through the approval workflow before it can be finalized. When it is off, transactions can be finalized without any approval step.
Email Notifications
When on, approvers receive an email each time a transaction is submitted for their review. Approvers who prefer fewer emails can switch to a scheduled digest instead of per-transaction emails by visiting their personal notification preferences at /user/email_digests/edit and updating the Decision Required section.
Email digest preferences are managed by each individual user, not by account admins. Remind your team that they can adjust their own notification frequency at any time.
Automatically Request Approval
When on, transactions are automatically submitted for approval as soon as all required fields are filled in or the transaction is marked complete — based on your account's submission rules configured at /settings/transactions/submission_rules/edit. When off, someone must manually submit each transaction for approval.
Turning off Require Approval will automatically disable Automatically Request Approval as well.
Sync Blocking Controls
Two separate toggles let you control whether unapproved transactions can reach your connected systems.
Block Accounting Sync
When enabled, unapproved transactions are hidden from the accounting sync view by default, preventing accidental syncing before approval is complete. If needed, your team can still manually reveal and sync individual transactions on a case-by-case basis.
Block PMS Sync
This is a stricter control. When enabled, work orders cannot sync to your property management system at all until every related transaction split has been approved. Unlike Block Accounting Sync, this restriction cannot be bypassed manually.
Enable Block PMS Sync when work order accuracy in your PMS is critical. Any unapproved transaction splits will hold the entire work order from syncing until all approvals are collected.
Configuring Approval Rules
Approval rules define who must approve a transaction and under what conditions. Each rule is evaluated independently when a transaction comes in, and all matching rules apply.
Adding a Rule
- On the Transactions Approval Workflows page, locate the Approval Rule section.
- To add a second rule, click + Add rule next to the next numbered rule slot.
- Click Save when you are finished.
Setting Up an Approval Step
Each rule contains at least one approval step. Within the step:
- Use the selector next to Request approval from to choose whether approval requires Everyone (unanimous) or Anyone (a single member) from the approver group.
- Use the approver search field to find and select the users who make up this approver group.
- To require multiple sequential approver groups within the same rule, click Add another approval step.
Everyone vs. Anyone
- Everyone — every person in the group must approve before the workflow advances to the next step. Use this when unanimous sign-off is required.
- Anyone — only one person in the group needs to approve. As soon as one member approves, the remaining members receive a voided notification letting them know no further action is needed. Use this when you need coverage across time zones or schedules and a single approval is sufficient.
Auto-Approval for Submitters
If the person who submitted the transaction is also listed as a required approver in the workflow, they are automatically marked as approved for their step. This prevents workflow bottlenecks when the submitter and an approver happen to be the same person.
Optional Conditions
Expand the Optional Conditions section within a rule to restrict when that rule applies. Available conditions include:
- Card group — the rule only triggers for transactions made with cards belonging to the specified group.
- Property — the rule only triggers for transactions associated with a specific property.
- Dollar amount threshold — the rule only triggers when the transaction amount meets the minimum value you set (for example, $80.00 or more).
A rule with no card group condition acts as a catch-all — it applies to transactions from any card, regardless of which group the card belongs to. Combine a catch-all rule with a dollar threshold to automatically escalate large purchases to a senior approver.
Card Groups as Rule Conditions
Card groups are organizational labels that associate users and cards by team, department, or region — for example, "Maintenance," "Housekeeping," or "Northeast Region." When a transaction comes in, Topkey checks whether the card belongs to a group that matches a rule's card group condition. If it does, that rule's approval requirements apply to the transaction.
Using card groups as conditions lets you delegate approval responsibility to the right managers without building separate workflows from scratch. A rule with no card group condition will match transactions from any card.
Approver Actions
Once a transaction is submitted for approval, designated approvers can take the following actions:
- Approve — marks the approver's decision as approved. Once all required approvals in a step are collected, the workflow advances automatically with no extra action needed.
- Deny — rejects the transaction and cancels the entire approval process. A reason should be provided so the cardholder understands why the transaction was rejected. The cardholder receives an SMS notification when their transaction is denied.
- Cancel — allows the person who submitted the approval request to withdraw it while it is still under review. The transaction returns to a pending state, and all approvers who were actively reviewing it are notified of the cancellation.
- Bulk Approve — approves multiple transactions at once. To use bulk approve, all selected transactions must be at the same step in the approval process, pending approval from the same person, and following the same approval workflow.
Notifications Summary
| Channel | When it is sent | Who receives it |
|---|---|---|
| Transaction pending a decision | Designated approvers (configurable via the Email Notifications toggle and personal digest preferences) | |
| In-app | Transaction pending a decision | Designated approvers |
| SMS | Transaction is denied | The cardholder |
| Voided notification | One member of an Anyone group has already approved | Remaining members of that group |
Bank Transfer Approval Workflow
In addition to card transactions, Topkey supports an approval workflow for bank transfers so that internal fund movements require approval before they are processed. To configure transfer approvals, navigate to Settings → Workflow Settings → Approvals → Transfers and follow the same rule-building steps described above.
Transaction Tags
You can create custom tags for card transactions to help categorize and search expense records. To manage tags, navigate to Settings → Cards → Transaction Tags. From there you can:
- Create a new tag by entering a descriptive label and saving.
- Edit an existing tag to update its label.
- Reorder tags to control the order they appear when categorizing transactions.
- Delete tags that are no longer needed.
Tags appear as selectable options when reviewing or coding card transactions, making it easier to filter and report on specific categories of spend.
Tips
Use card groups to delegate approval responsibility to the right managers without requiring them to review every transaction across the account.
Combine dollar thresholds with card group conditions so routine small purchases are not held up in the approval queue while larger or unusual charges receive the scrutiny they need.
Enable Block PMS Sync when work order accuracy in your PMS is critical. Unapproved transaction splits will prevent the related work order from syncing until all approvals are in place.
Frequently Asked Questions
What happens if no approval rules are configured but the Require Approval toggle is turned on?
The page will prompt you to configure at least one approval rule before the account-level settings can be saved. The toggles are inactive until a valid rule exists.
Can an approver approve their own transaction?
If the person who submitted the transaction is listed as a required approver, they are automatically approved for their step. This is a convenience feature designed to prevent workflow bottlenecks, not a bypass of the approval process — all other required approvers in the workflow still need to act.
What is the difference between Block Accounting Sync and Block PMS Sync?
Block Accounting Sync hides unapproved transactions from the accounting sync view by default but allows your team to manually override and sync individual transactions if necessary. Block PMS Sync is a hard restriction — work orders cannot sync to the PMS at all until every related transaction split has been approved, and this cannot be bypassed manually.
Who should I contact if I need help setting up my approval workflow?
Contact Support and a member of the Topkey team will assist you.