Inventory
Receiving Inventory
Receivings let you record when physical inventory arrives at one of your warehouse locations. Each time you log a receiving, Topkey automatically increases stock levels for the items you received, keeping your inventory counts accurate.
The Receivings List
The Receivings page shows all recorded receivings in reverse chronological order. Each row displays the date and time of the receiving, the items included (with a count of additional items when there are more than one), the total quantity received, the destination location, unit cost, and total cost.
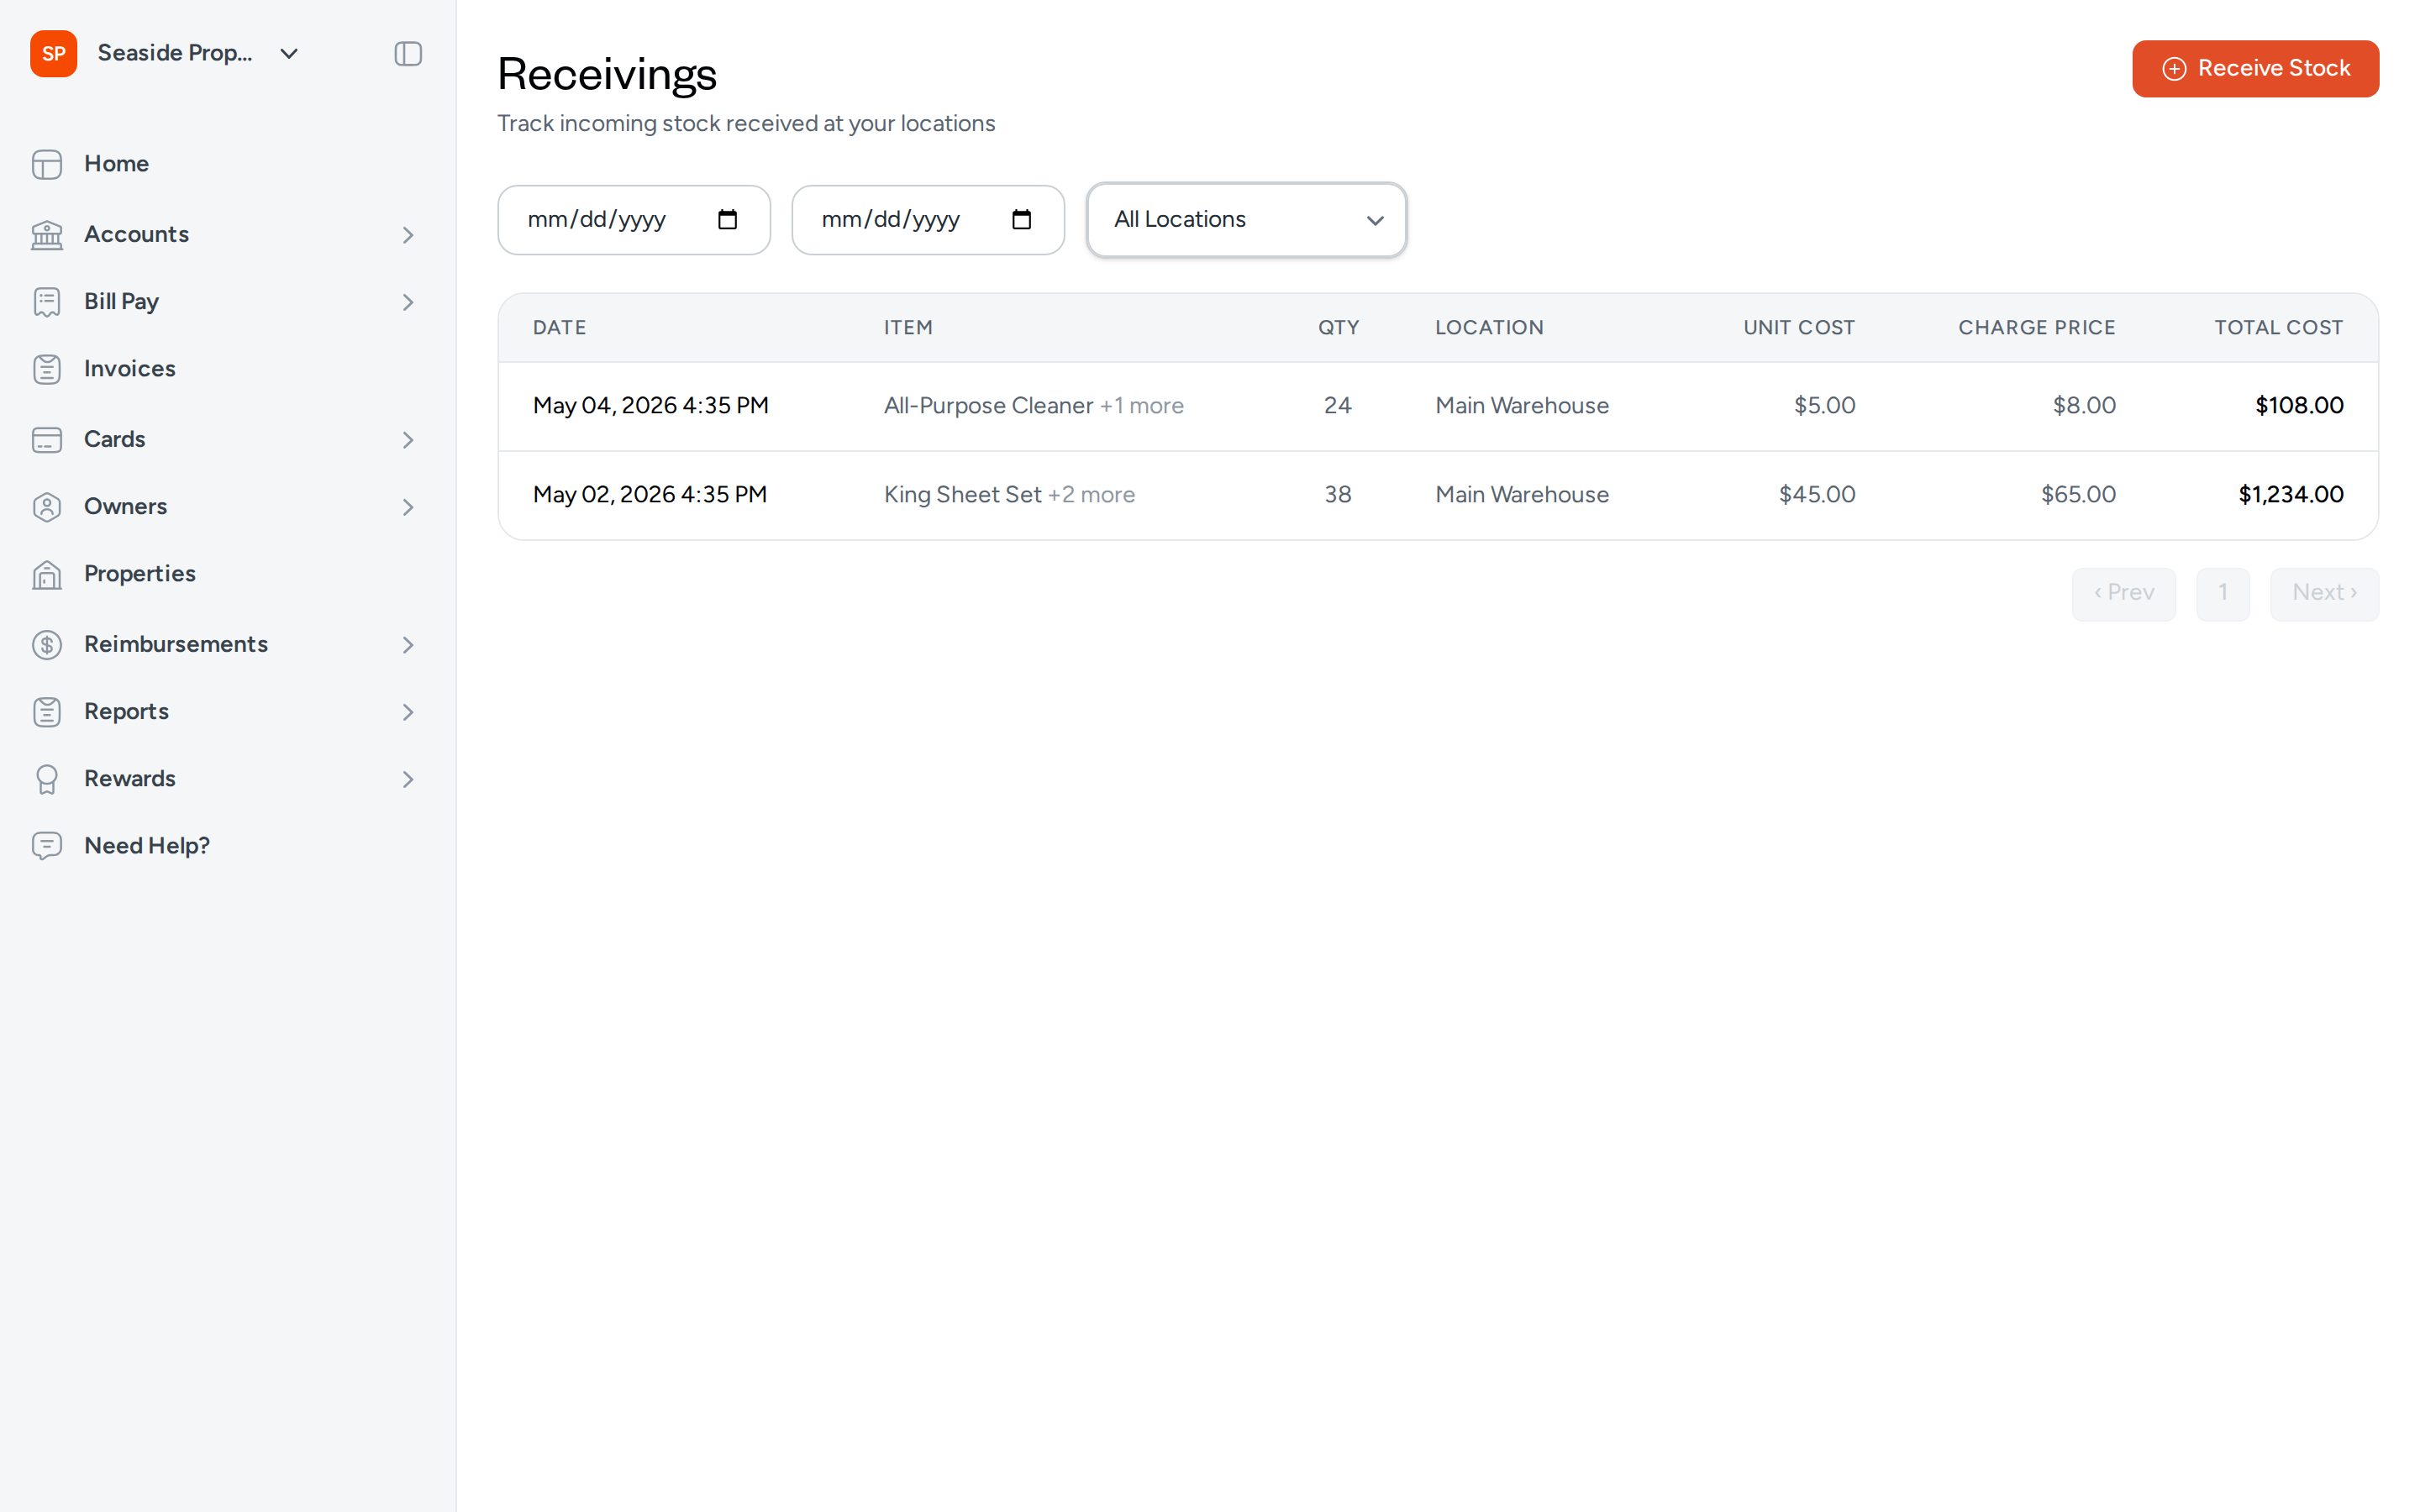
Filtering Receivings
Use the date range fields and the location selector at the top of the page to narrow the list:
- Start date / End date — Show only receivings that were recorded within a specific date range.
- All Locations — Filter by a specific warehouse location. Select a location from the list to see only receivings at that location.
The list updates automatically when you change any filter.
Unreceived Purchases
When a transaction in Topkey is categorized as Bill to Inventory and has not yet been linked to a receiving, it appears in the Unreceived Purchases section at the top of the Receivings page. This section helps you stay on top of purchases that still need to be matched to incoming stock.
Each unreceived purchase shows the transaction date, merchant name, amount, and — if available — the card used and any transaction splits.
Receiving Stock from a Purchase
To record a receiving directly from an unreceived purchase:
- Locate the purchase in the Unreceived Purchases section.
- Click Receive Stock next to that purchase.
- Topkey opens the Receive Stock form with the transaction pre-linked. Complete the form as described in Creating a New Receiving below.
Dismissing a Purchase
If a transaction appears in the unreceived purchases list but is not actually for inventory stock, you can dismiss it so it no longer appears:
- Click the × icon to the right of the purchase you want to remove.
- Confirm the dismissal when prompted.
The purchase will no longer appear in the Unreceived Purchases section.
Restoring a Dismissed Purchase
If you dismiss a purchase by mistake, you can restore it to the unreceived purchases list:
- Locate the purchase in the dismissed purchases list below the unreceived purchases section.
- Click the restore option next to that purchase.
The purchase will reappear in the Unreceived Purchases section as if it had never been dismissed.
Bulk Dismissing Purchases
To dismiss multiple purchases at once:
- Check the box next to each purchase you want to dismiss, or use Select all to select all visible purchases.
- Click Dismiss Selected in the controls bar that appears.
- Confirm the dismissal when prompted.
Use bulk dismiss to quickly clear out purchases that were miscategorized as Bill to Inventory — for example, transactions that were later re-categorized or split across multiple classifications.
Creating a New Receiving
You can create a receiving manually at any time, with or without linking it to a purchase transaction.
Click Receive Stock in the top-right corner of the Receivings page to open the Receive Stock form.
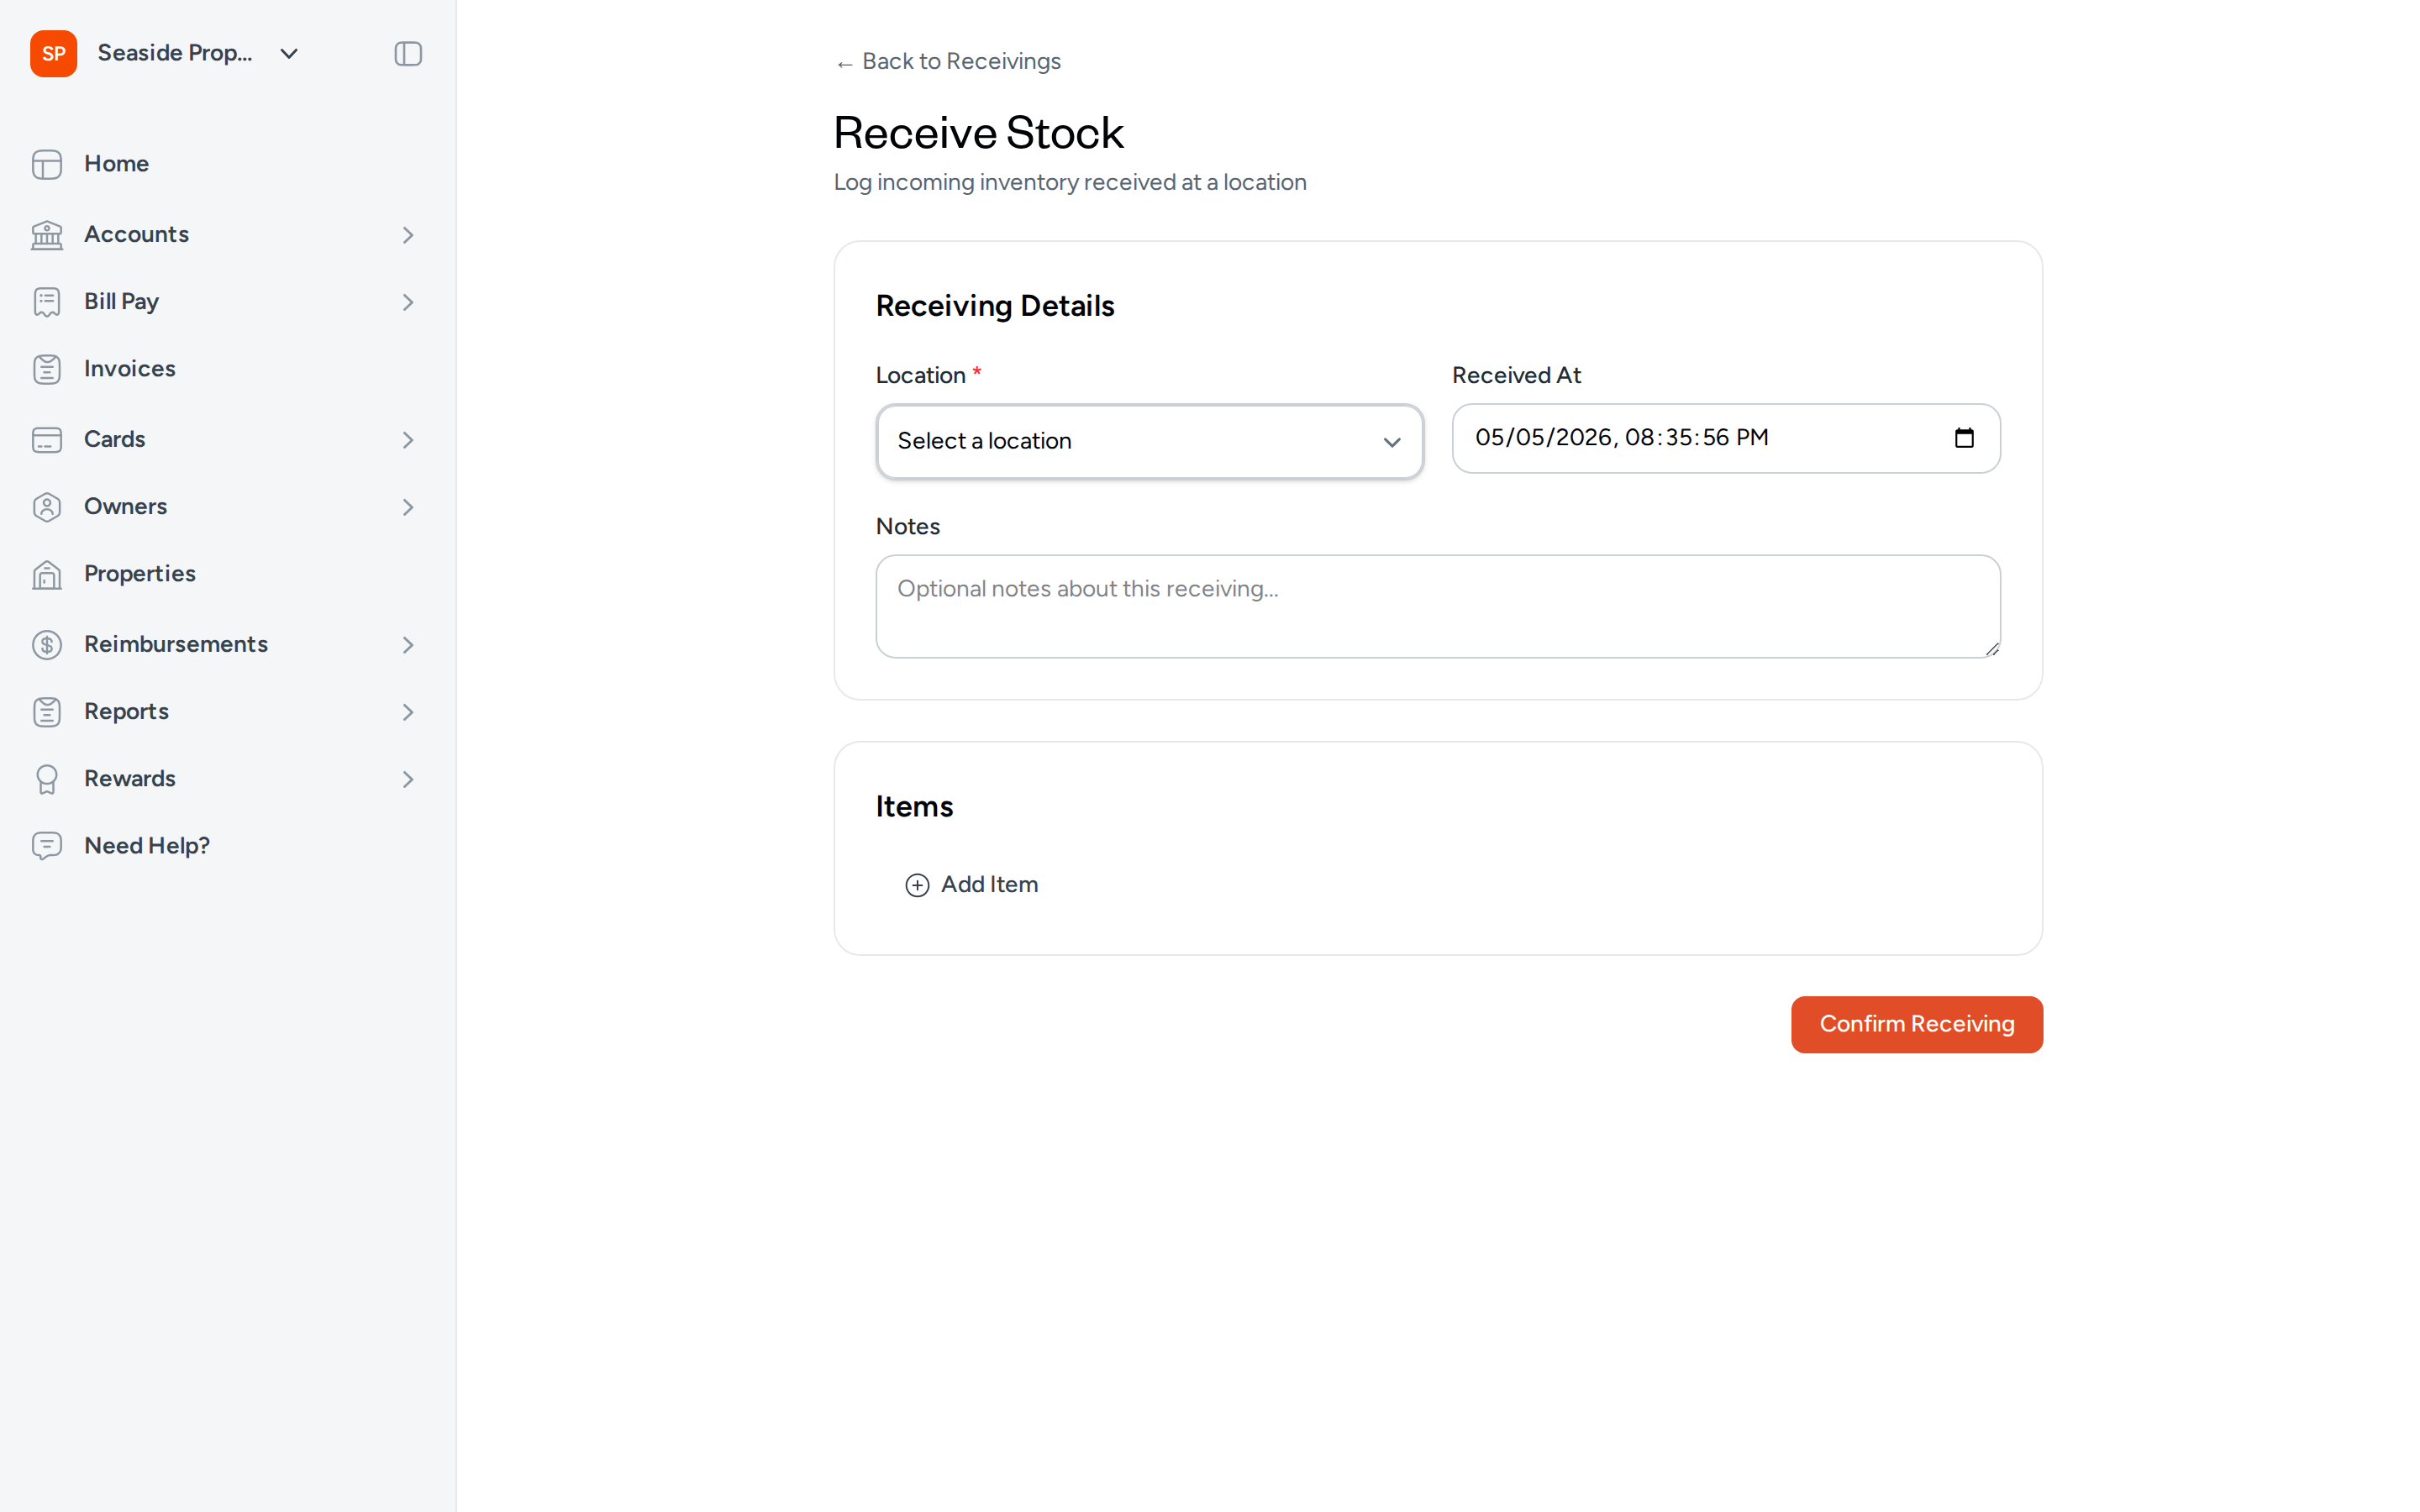
Step 1: Fill in Receiving Details
In the Receiving Details section:
- Location — Select the warehouse location where the stock is being received. This field is required.
- Received At — The date and time defaults to the current moment. Adjust it if you are recording a shipment that arrived earlier.
- Notes — Optionally add any notes about this shipment (for example, "Monthly linen restock shipment"). If you started this receiving from an unreceived purchase, the merchant name will be pre-filled here.
Step 2: Add Line Items
In the Items section, click Add Item to add each product you are receiving:
- Item — Select the inventory item from your catalog.
- Quantity — Enter the number of units received.
- Unit Cost — Enter the cost per unit for this shipment.
Repeat this step for each distinct item in the shipment. You must add at least one line item before you can save.
Step 3: Link to a Purchase Transaction (Optional)
If you started the receiving from an unreceived purchase, the transaction is already linked and displayed at the top of the form. If you are creating a receiving manually and want to associate it with an existing purchase transaction, you can do so by starting from the Unreceived Purchases section and clicking Receive Stock next to the relevant transaction.
Each purchase transaction can only be linked to one receiving. If a transaction is already linked, it will no longer appear in the Unreceived Purchases list.
Step 4: Confirm the Receiving
Click Confirm Receiving to save. Topkey immediately increases stock levels for each item at the selected location.
Receivings cannot be edited after they are confirmed. Double-check your quantities and location before clicking Confirm Receiving.
What Happens When You Confirm a Receiving
When you confirm a receiving, Topkey:
- Increases the stock level of each line item at the selected location by the quantity you entered.
- Records who completed the receiving and when.
- Links the receiving to the associated purchase transaction, if one was provided, removing it from the Unreceived Purchases list.
Stock level changes are reflected immediately on the Stock Levels page.
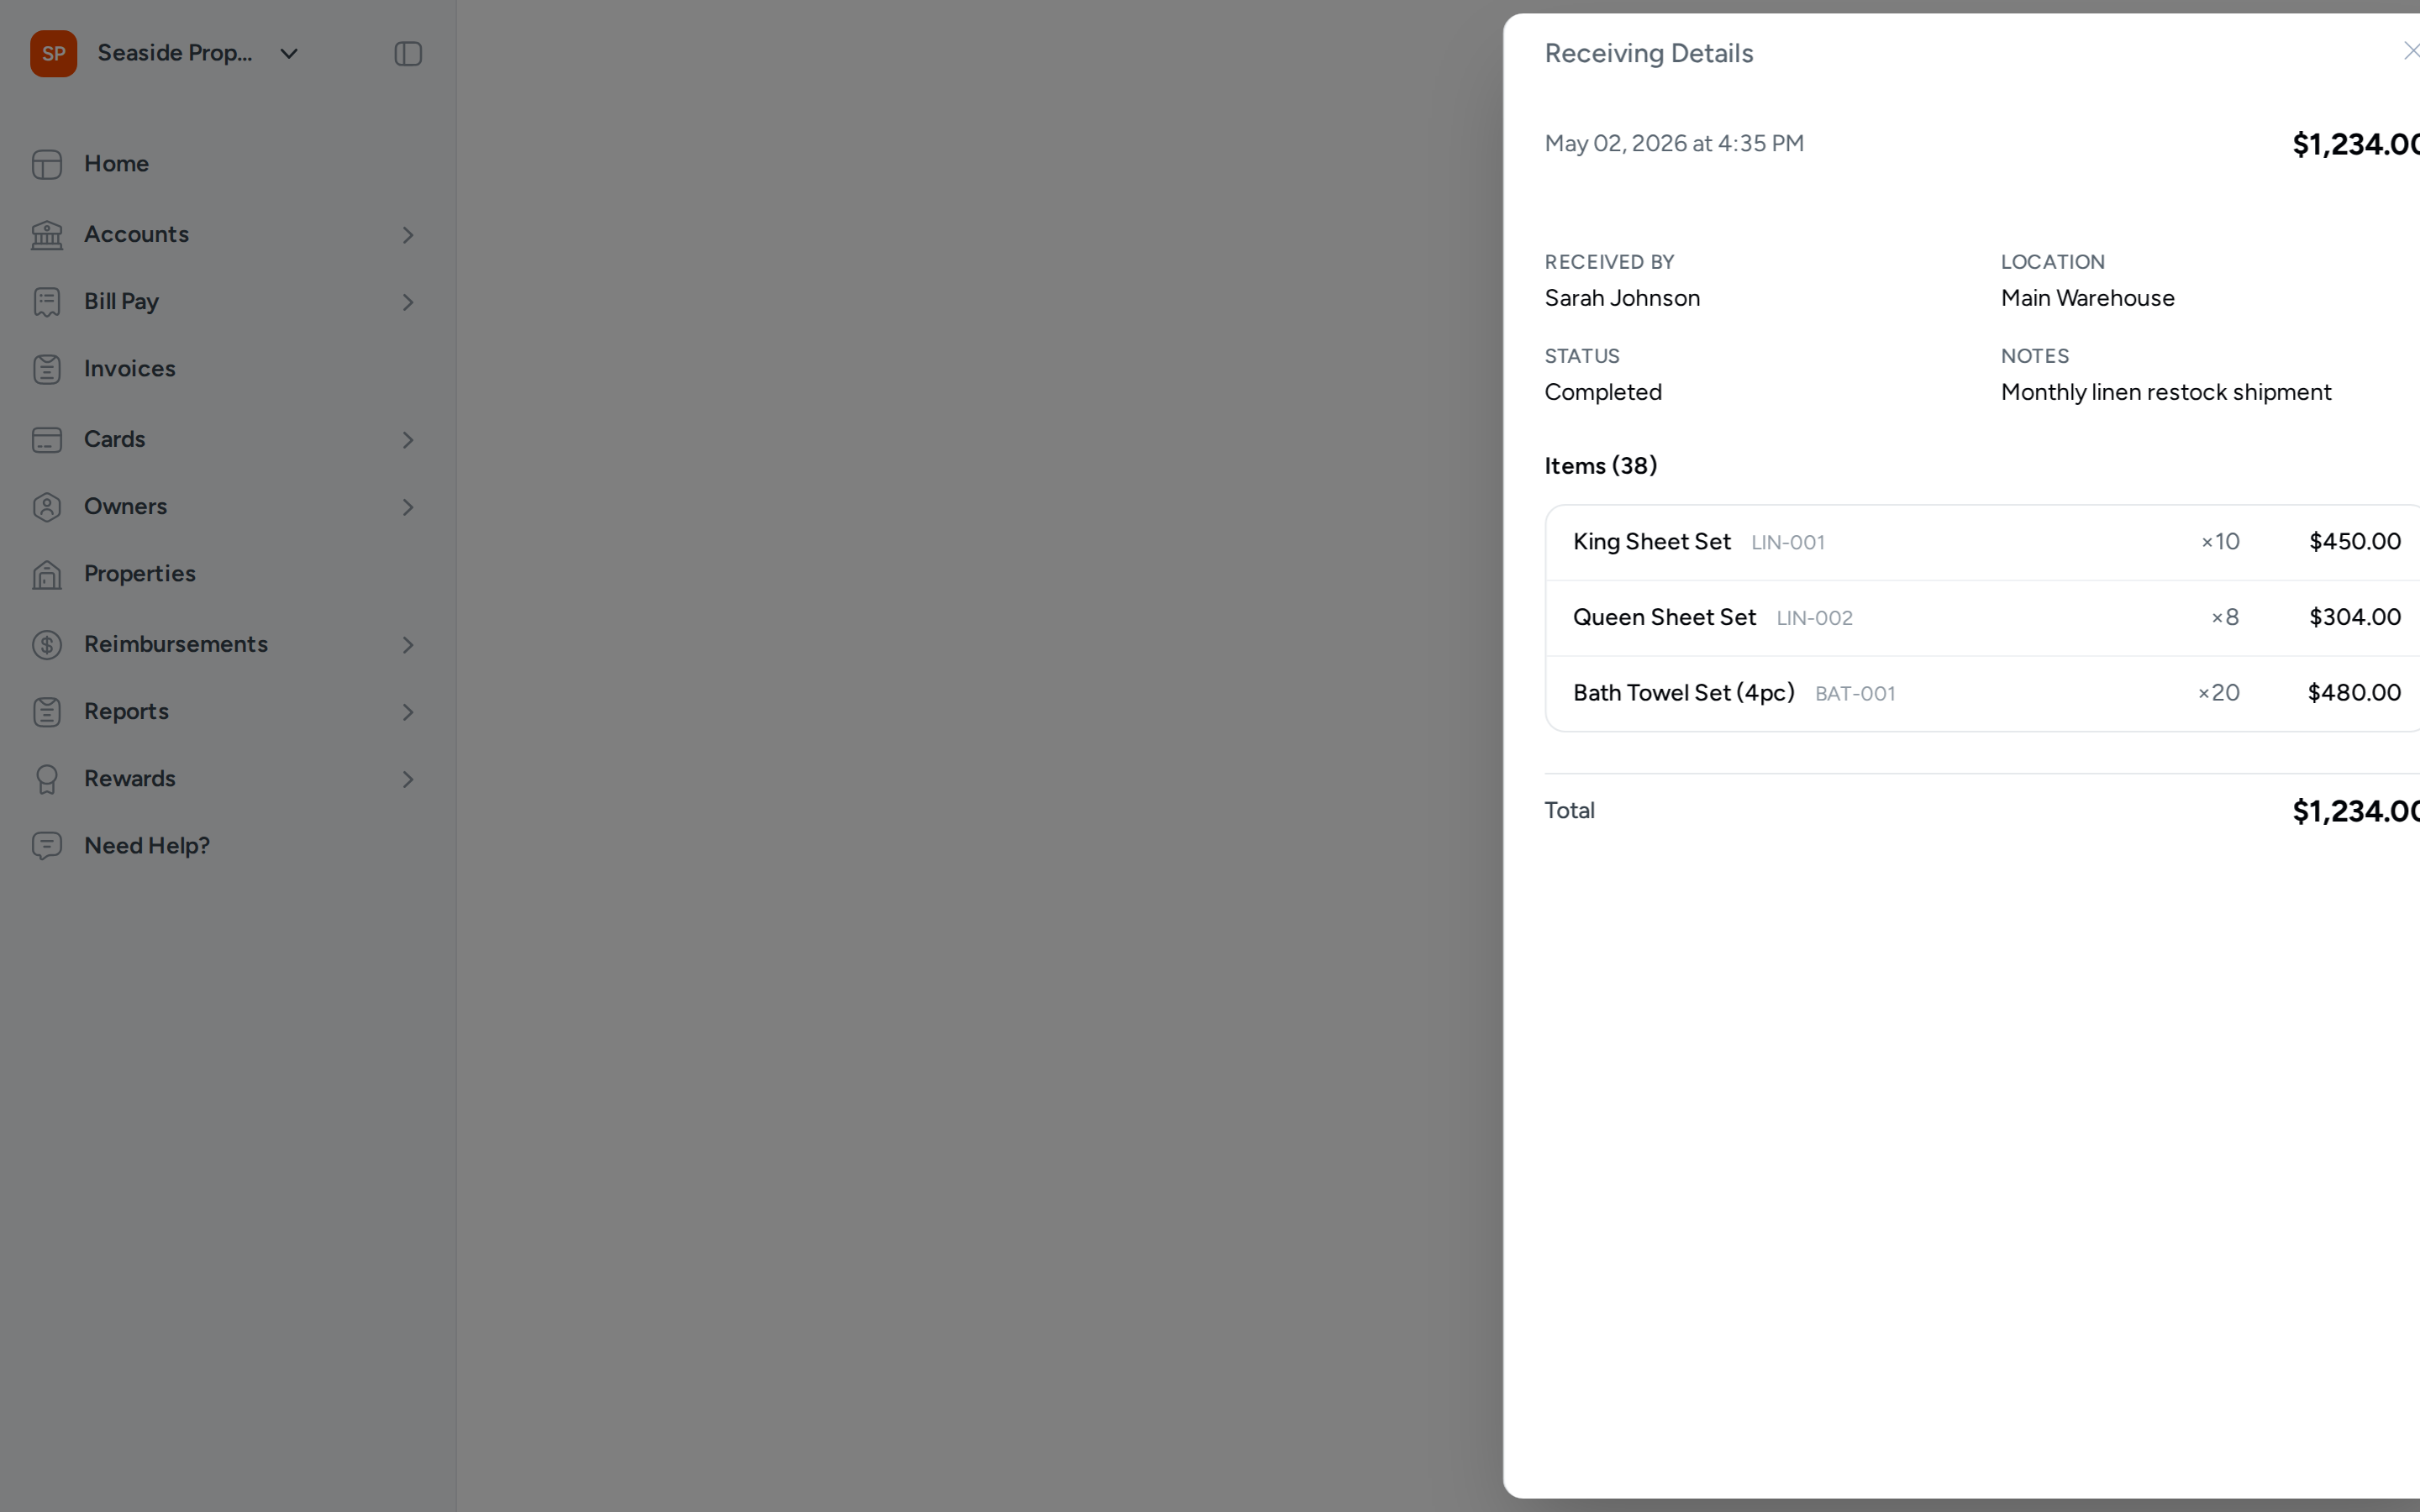
Viewing Receiving Details
Click any row in the Receivings list to open the Receiving Details panel. The panel shows:
- The date and time of the receiving, and the total cost of the shipment.
- Received By — The team member who confirmed the receiving.
- Location — The warehouse where the stock was received.
- Status — Either Completed or Pending Review (see Receiving Statuses below).
- Notes — Any notes recorded at the time of the receiving.
- Linked Transaction — If the receiving was linked to a purchase, the merchant name, amount, and purchase date are shown. You can click the transaction link to view its full details, and if a receipt is attached, click View Receipt to see the original document.
- Items — A list of every item received, including the item name, SKU, quantity, and line total.
Receiving Statuses
Each receiving has one of two statuses:
- Completed — The receiving has been confirmed and stock levels have been updated. This is the status for all receivings created through the standard Confirm Receiving flow.
- Pending Review — The receiving has been recorded but may require additional review before it is considered final. A receiving in this status has still been saved, but you should verify the details with your team.
Frequently Asked Questions
Can I edit a receiving after it has been confirmed? No. Once a receiving is confirmed, it cannot be edited. If you recorded incorrect quantities or the wrong location, contact Contact Support for assistance.
What if I received a shipment across multiple deliveries? Create a separate receiving for each delivery. Each receiving tracks one shipment arriving at one location at a specific date and time, so splitting them accurately reflects when stock was actually received.
What happens if I dismiss a purchase and then realize I need it? You can restore a dismissed purchase back to the Unreceived Purchases list at any time. Locate it in the dismissed purchases list and click the restore option to bring it back.